Thursday, 27 September 2012

Purple Ombre Cake


So today my mum's work hosted a Coffee Morning in support of Macmillan Cancer Support, and I was asked if I would donate a cake to their bake off, the answer was of course yes! I do love a cheeky charity bake off.


After I'd been named and shamed in their company email saying I could outbake them all (which I'm not sure were my words!) I knew the pressure was then on to make something special, and I had just the cake. I've been wanting to make an ombre cake for a while now, and while I hadn't practiced it before I figured I'd just wing it, my usual approach!

So, my decision was made, and the colour? Purple. I decided to make 4 layers from plan to bright purple, each layer was made up of a 5 egg mix.

250g butter
250g sugar
5 eggs
250 flour
2 tsp baking powder
1tsp vanilla sugar


First I creamed the butter and sugar and added half of the flour, baking powder, 2 of the eggs and mixed and then added the remainder of the ingredients, mixed and baked for about 40-60 minutes with two tins (yes my actual cake tins, I'll always bake in them!) in the oven at the same time. I made the first layer with no colour and the second I added just a drop of Sugarflaire colouring paste Grape Violet to make it only slightly lilac.


The next batch I doubled the colour and kind of went to town on the last batch, I always worry coloured sponge will look a little dull and wasn't sure how it'd turn out...well...you can see for yourself! Once cool I leveled the cakes to create for equal flat layers.


Next I had to ice it with buttercream, I made a ridiculous amount! To the point where I had to consult Twitter to see if I could freeze it - yes I could - phew! First I applied a crumb coat of a very pale lilac and then made a mammoth batch to split into three. The first batch I kept pale like the crumb boat and the next two I tried to be braver with to really make them bright and vibrant, the colour can go really strong so don't be afraid to use it!


I decided to make three rows of roses with buttercream, the darker at the bottom and lightest at the top and the base of the top filled with roses. For the roses I used the Wilton 1M nozzle, as normal - it is my favourite as you know. It's important to keep all of the columns of roses in a line for a neat look...it has to be neat! To fill all of the little gaps I just piped stars into them, and t hey all happened to be in the same lines so it all matched too.


In hindsight I should have bought a bigger cake board, I did it all a bit last minute so I had to get it from Tesco and it just about fit! I'm normally very critical of my cakes but I have to say I was really proud of this one! I was dying to see what it looked like inside but had to wait until my mum could send me a photo after it had been cut.


sorry I know there's a lot of of pictures to go through!


The coffee morning was a great success and they raised over £140 which is brilliant. I came runner up, considering I don't actually work at that company I thought that was pretty good going, and I got to make a proper show stopper cake which I haven't done in ages.


Anyway, for those too scared try an ombre cake...be not afraid! Bake, bake it now!

Nom! Pin It Now!

Sunday, 23 September 2012

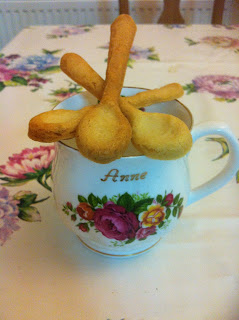
Rolo Shortbread and Shortbread Spoons

Sometimes when you need a little 'pick me up' you know you just have to bake something, and is it just me or does shortbread feel more like a wintery treat? I'm one of those people that love winter, I do like summer don't get me wrong but I definitely prefer the cold to the warm, big jumpers, hot chocolate and blankets appeal to me much more! So when it started to get cooler recently I decided it would be a good time to start making shortbread again.


I've got this shortbread mould I got for Christmas last year which I've been meaning to try out, it's a beautiful Mrs Beeton one from Tesco, so that when you flip it over to get the shortbread out, it comes with a pretty pattern - yay! As normal I used my grandmother's Norwegian shortbread recipe, it's just the best in my opinion, but to make it a bit more special I decided to cut up Rolos into it, everyone's a bit obsessed with them at work at the moment so I thought it'd be a good place to try them out.


 Personally I think it could have done with bigger chocolate chunks for when it gets all melty (yes that's a word...ish), also when I turned it out of the mould to fish it out I noticed the mould had a big crack in it, after one use!! I did contact mention this on Twitter and Tesco saw it and got in contact with me, only to then tell me it had been to long since the purchase...even though in my tweet I did mention it was a CHRISTMAS present, I'm not sure how they didn't notice that part before saying it had been too long - of course it had been too long, boo to false hope! Rant over. It's made out of similar stuff to tiles...so I've tried to patch it up with glue and will see if it holds out next time I dare to use it. Also the pattern didn't show up on the shortbread so it was a bit of a fail all around to be honest. I did however some of the Rolo mix left so I made some extra biscuits too.


Anyway,  I had some dough left so decided to make some shortbread spoons with a mould I bought from Sew White. I'd seen on the website that you could make gingerbread spoons so thought this could be a nice idea for coffee and hot chocolate etc. I simply filled the spoons tightly with the mixture, they don't rise a crazy amount so don't have to worry about it all spilling out, and simply take out when golden. try to them let them cool before popping out of the moulds...I couldn't!

Rolo Shortbread

Recipe:
330g plain flour
250g butter
100g icing sugar
1/2 tsp baking powder
1 big pack of sharing Rolos, I didn't use all of them, it's all about preference I guess...and you can't eat the ones you don't use after!

Method:


  • Mix flour and baking powder and sift into a mixing bowl.
  • Cut up the butter and crumble into mixture as well as you can.
  • Add the icing sugar and mix into a smooth dough.
  • Gease the mould with butter and roll out the dough into a
    big circle about 0.5cm thick and push into the mould.
  • With whatever dough you have left, roll it into a 4/5 cm sausage and chill for 30 minutes, then just slice up and bake for 12-20 minutes until golden.
  • Chill in the fridge for 30 minutes.
  • Preheat oven to 180 degrees (160 fan oven)
  • Bake for 30 minutes depending on oven, the normal time for this recipe is about
    12 minutes but as it's in a mould it takes longer, I think mine took up to 40minutes
    in the end, you'll know when it's done as it will smell EPIC and be beautiful and gold.
  • Before it cools slice around the edges so it'll be easier to get out, you'll want to get it out of the mould before it fully cools or it'll get stuck.
  • Eat. Nom!!!


Pin It Now!

Thursday, 20 September 2012

In Nature Teas - Pure Red Rose Flower Black Tea Review

Okay, confession time and I feel in the cake world it's kind of a big deal...are you ready?.... I've never had a cup of tea, not a full one anyway.  I always think they will taste kind of ...old? An irrational fear I know. I don't like coffee either but I've always wanted to be able to drink tea, can get a bit awkward asking for squash all of the time.


So when In Nature Teas contacted me asking if I'd like to try them I kind of saw it as an opportunity to face my tea demon! I thought that maybe with real tea it would be different, so when a box of Pure Red Rose Flower Black Tea* arrived at my door I decided to man up, and drink a bloomin' cup of tea! This being real tea, eg. loose leaf tea from China I realised I could use a strainer, I know you don't really have to but I kind of love the idea of doing it old school - fancy cup, loose leaf tea, strainer - done!


So, after psyching myself up for my first cup I read the instructions - yes I know this sounds mad but with loose leaf tea you have to treat it a bit more delicately, the water couldn't be over 85C and I got to test this with my new chocolate thermometer, it actually only took a couple of minutes after boiling the kettle to reach this temperature. They do suggest you use clean mineral water to boil with to get the most out of the tea.


So there I was, cup of 85C water at the ready, I placed 1 1/2 spoons of the tea in the strainer, and there was actually little flowers in the bag! I actually found this fact really exciting, everything was pointing to the fact that I was going to like this cup. Okay so after the excitement about the flowers died down I closed the strainer and left it in the water for about 4 minutes as recommended. I probably could have left it in longer but I didn't want to be too brave too soon!


It actually smelled really lovely and although I was cautious, I tried it...and you know what? I actually really liked it! Me! Drinking tea! Now it's getting colder too I could actually see myself indulging in a cup of special tea more frequently...with cake of course ;) Try them out and be surprised! Pin It Now!

Monday, 17 September 2012

Scandinavian Kitchen - London

A couple of weeks ago we were in London for the last day of the Paralympics 2012, not lucky enough to get or afford tickets to the closing ceremony we decided to spend the day exploring London after leaving the Olympic Park.


I've already put up the post of our visit to Choccywoccydoodah, so now I'm going to tell you about our trip to the Scandinavian Kitchen earlier that day. After going to Norway 2-4 times a month over the last year up until June we now haven't been in a little while so need to stock up on a few bits and pieces and get some traditional lunch.


The Scandinavian Kitchen can be found at 61 Great Titchfield Street, London W1W 7PP - you won't miss it, it's bright red!  A lovely cafe with real scandi food and lots of tempting treats to buy including chocolate, cupboard ingredients and even meat!


Now the food, of course the food! I couldn't write about this place and not talk about it could I? Traditional cakes, sandwiches and hotdogs - if you haven't been to a Scandinavian country you simply won't understand about the hotdogs I'm afraid, a bit similar to bockwurst but more slimline looking. They have these on most street corners in Norway and we still have a few packets in the freezer to keep up going, I guess it's their version of fish'n'chips.


We decided to go for some open-faced sandwiches, or 'topless' ones as they called them. I have to say this was a big adjustment when we moved over there, as kids we were used to think Kingsmill slices, two of them! Not one slice of seedy brown bread topped with a bit of salad and egg - now I don't want to eat anything but. We had three slices each of rye bread topped with smoked salmon, egg and prawn - all of the best ingredients!


They also gave free coffee refills, according to my mum this is the mark of a good coffee shop, and the coffee itself was great so she was happy!


We also of course had to look around the food section, aware of the fact we had to spend the day walking about London so we didn't want to carry too much - but we still bought quite a bit! Check out our haul, we did get a few other bits but they're secrets for others for Christmas so can't put them on here :D


Pin It Now!
Related Posts Plugin for WordPress, Blogger...