Monday 31 October 2011

Butterfly Wedding Cupcakes

So this week I had my first wedding order, it's been in the works for a while and I can't believe it came around so quick. I've never done anything on this scale so it was certainly a challenge.

The theme was simple, pink and butterflies. A theme I'm really familiar with so I was actually really looking forward to it. I'm going to post a lot of pictures so beware!

They wanted 150 cupcakes and a giant cupcake for a top tier which I think is a great idea, I've seen it a few times and always thought it looked really cute, cupcake heaven!


The cases were a big part of the order and loved these paper wrappers and originally wanted them in black, pink and white, but bright pink was impossible to find so it had to be black and white. Pink buttercream was also the first idea, but magenta turns out to be an impossible colour to make! I couldn't make it anyway. So we decided it would look nicer with plain ivory buttercream with rice paper pink butterflies. These were really good because they looked like real butterflies, had great detail and were completely edible.


To finish them off I dusted them with pink cake glitter to make them really sparkle. The cupcake tower said it could hold up to 120 cupcakes...wrong! I don't see how this would work unless they were petit fours! Luckily I had prepared for this and already had two of the silver 23 cupcake holding towers. The rest had to be scattered around the three towers which did make them look like they were cascading around.


The top tier was plain as shown, they said they were going to put a bright pink cake topper on it, but I didn't get a picture of that so you will just have to imagine. As luck would have it I had a little stand perfect for giant cupcakes that I got for Christmas from Sainsbury's which is luckily white too so it fit in perfectly.


Now I've done my first wedding I can't wait until I get another order, I can be a bit of an angry baker when I get stressed, but this didn't stress me out one bit it just flowed, so my confidence is growing too. I'm just so happy with how professional it looked.

My poor house was totally taken over by these cakes, I took a day off just to make and decorate them. The baking wasn't too bad, it was the icing! It took me hoooooooours, and I was stood at a funny angle for ages too so I felt destroyed by the end of it. I even had to extend our table just to fit them all in.

What is even more impressive is that we managed to get them all inside my mums little Peugeot 106, 150 cupcakes and one big one. All in boxes from the supermarket, cake tins and also the trays that hold Muller yoghurts in, I collected them from Tesco! Eco friendly too! And a perfect fit for cupcakes...who knew eh. Pin It Now!

Tuesday 25 October 2011

Sparkly 21st Giant Cupcake

So from a zombie brain cake to a sparkly cupcake, a natural transition of course!

While Monday was about creating gore, yesterday I was back creating my usual giant cupcakes bursting with pink and glitter.

This one is very similar to my last 21st giant cupcake, it was a double order from the same lady so I wanted them to be similar but not the same. This one is a chocolate sponge iced with vanilla buttercream.

This time I made the bottom 'case' part a cute girly pink colouring it with Clare Sugarflair colouring paste. The top of course didn't need any colouring and the ivory colour looks really clean and fresh next to the pink.

I think the glittery fondant cutouts worked really well last time so I used this idea again with a glittery 21, butterflies and big and small heart.  I've always found it hard to apply to cake glitter, but I stole an idea from Choccywoccydoodah where they dip a clean and dry soft brush in the glitter and tap it over the area rather than trying to gently tip it on...which never works! It also spread the glitter out more evenly.

I really am loving using the butterfly plungers, you get such good detail on them and when covered in glitter, what girl wouldn't love them?

To finish it off I tied up some pink gingham ribbon around the case, which I think I need to buy more of actually as I really don't think I can have much left on the reel now!

I will try to stop forgetting to take pictures after I've already boxed them up, I could probably display them a little better :) This is now the last cake I've got to do with week before I start the wedding order tomorrow, which I though I'd be quite nervous about but I feel really relaxed and confident about it so can't wait to start. I've also got thursday off so I can focus on it 100% with no stress. I'll get pictures up as soon as I can :) Pin It Now!

Monday 24 October 2011

Cambridge Zombiegeddon Brain Cake!

So from traditional to down right freaky. This month I was asked to make a cake fit for zombies...a brain cake of course!

This cake is to support the Cambridge Zombiegeddon, a flash mob zombie walk for Halloween. I've taken all of this technical description from their page so I get it right :)

"A flash mob (or flashmob) is a group of people who assemble suddenly in a public place, perform an unusual and sometimes seemingly pointless act for a brief time, and then disperse, often for the purposes of entertainment and/or satire. Flash mobs are organized via telecommunications, social media, or viral emails The term, coined in 2003, is generally not applied to events and performances organized for the purposes of politics (such as protests), commercial advertisement, publicity stunts that involve public relation firms, or paid professionals


our aim is to do this at Halloween in Cambridge (Saturday the 29th) with anyone who would like to get involved it would sure as hell be fun!!! And that's the aim it's got to be fun and safe.
There will be 3 stages to this event with exact information becoming available shortly before the actual march so make sure you keep your eyes peeled.
There are a lot of different flash mobs zombie walks etc available on youtube I suggest you have a look to see what we are trying to aim for.
I have change the event to the Saturday for a few reasons mainly there are always more people in Cambridge and I am sure we will have lots of hungry zombies!! And we want a lot of people to witness the zombie march ... not only that, Saturday is a better day for most people.

So dress as a zombie and hunt for some brains tell your friends (BUT KEEP IT A SECRATE) you can be as original as you like or stick to the classic brain dead zombies. The wilder and more unusual the better.

We are currently looking to fill a few main roles in the organisation of the hoard.
We need a production team available to record the event although we encourage you to take a camera yourself and document the day, write a blog share on facebook or twitter.
If you think you can help in any areas at all please let us know it would be great to get your ideas and thoughts?

You can follow us on twitter @zombiegeddon_uk or #zombiegeddon share our events page on facebook or even use the flyer above.
Above all have fun
TM :D "


Right, now all of you cake lovers, let's talk about that big old brain! There was only really going to be one choice for the actual cake itself, Victoria Sponge simply wasn't going to do. So the logical choice was of course for Red Velvet cake! There's nothing better than when tucking into a brain than to see a gorgeous piece of Red Velvet under there. Although this cake wasn't really suited to cream cheese frosting so I opted for scary looking jam instead.


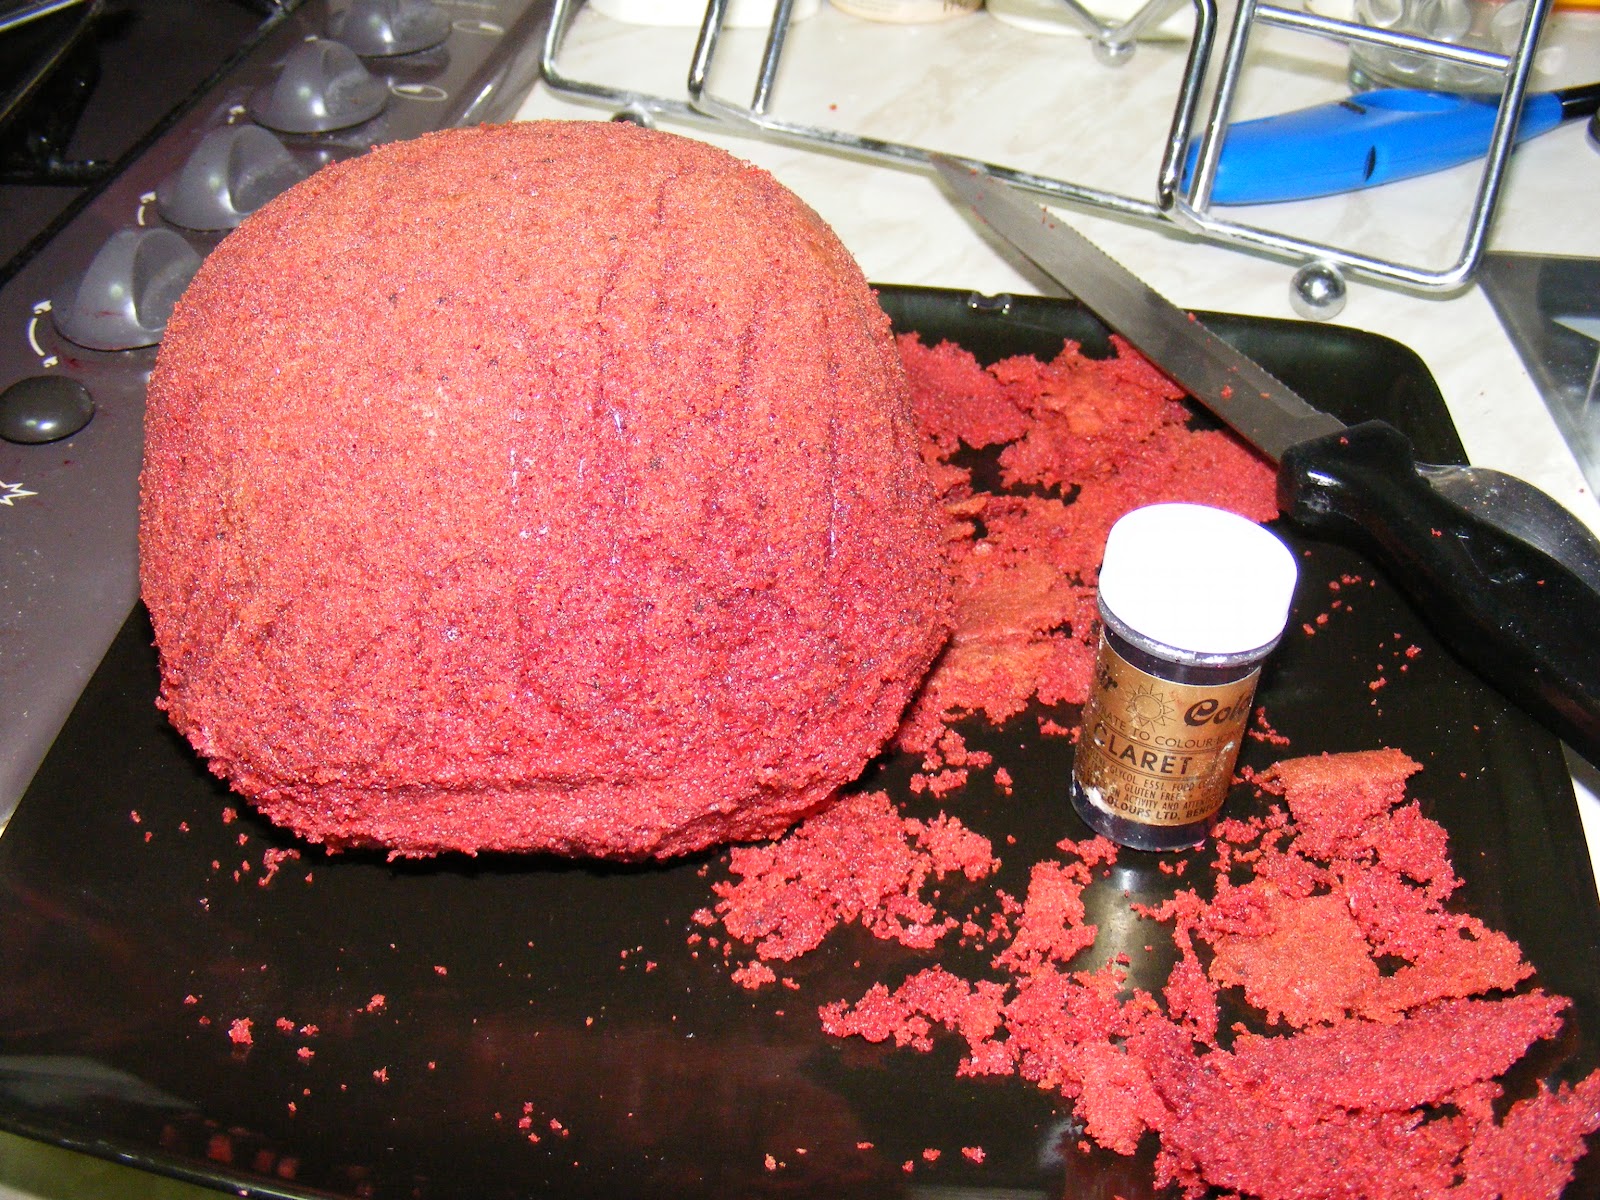
I baked the cake in a Pyrex bowl, perfect brain shape that my lovely mum bought for me because I couldn't find anything else that would fit. It took over an hour to bake because it was so fat and I wanted to do it in one big go rather than having to get pieces to match up.  I did have to carve down some sides to give it a bit of shape but other than that is was perfect.


I covered the cake in pink fondant coloured in Claret Sugarflair colouring paste. I tried to leave it a little marbled so it didn't look too perfect. I googled for good brain pictures for ages so I could get the right look. I decided I would make long sausages in the pink fondant, as long as I could and layer them on the cake in the squiggle pattern, pressing them against eachother to look like they were part of the same thing.


I wanted to get some shadowing to really bring out that good ole organ look - why not! Using Christmas Red (not very apt!) I used a brush to dab it in the creases Art Attack style, I watered it down a bit so it was more like paint. I dabbed it over some more to make it look a bit bloodied. I really wanted it to look like it had just been harvested from some poor unexpecting soul, and dumped in a box. So I created my own jam glaze. I didn't want to use an already red jam as I wanted it to be a bit lighter, so I used some jam I had left over from the Sachertorte, apricot. I then coloured it up with the same red and added water to make it a bit more glaze like so it spread more easily and looked a bit more like goo. Yum. I slathered this all over the brain enough to make any zombie drool...or moan?


To finish off the look I put the cake on some baking paper while I messily (on purpose) splattered some more blood jam on the brain so it splattered the paper. I wanted it to look almost like it came from a zombie butchers. There's no room for pretty cake boxes during zombieggon so I had a brain wave. I'd get a normal old boring cardboard box like you'd find in a bin and splat some bloody handprints on the side like passing zombies were trying to get to the brain. I did this with more Christmas Red and latex gloves...the food colouring is really hard to get off your hands so I decided to play it safe. I also did a bit of advertising with #zombiegeddon written on the sides just so you all know what the cake is supporting.


I then tied it all up with a lovely length of packaging string...pretty huh? And the look was complete. I'm actually really impressed with how it looked, fresh from a horror film and how easy it was to put together. I found it really fun to make as you do need something different upon all over the glitter and hearts now and then and what's better than making a cake that looks like a brain, ready to be feasted upon?


Happy brain eating.


Zom! x (did you see what I did there....) :D Pin It Now!

Sunday 23 October 2011

60th Diamond Wedding Anniversary Cake

Well it's about time I made something a little more traditional isn't it? I always make these quirky cakes, and I do love them and am used to the crazy ideas. So when I was asked to make a cake for a 60th wedding anniversary I knew it had to be quite traditional. It was a bit of a challenge for me but it's good to do something different than what I'm used to, I also got try out some of my latest baking buys too. No sparkly butterflies or 2D Super Mario's on this one!

They wanted the cake in a diamond shape, with a pretty cake topper and to feature carnations. I'd seen some nice cake toppers online but they're so expensive! So I had the great idea that I could always try to make one..these people do so why couldn't I? I googled for a while to find a good tutorial and I found one telling me how to make spiral wire toppers, perfect.

They're really pretty and you add beads to them which makes them look a bit like jewelry, I made this a couple of weeks ago so I would have time to re-do it if it went wrong. Luckily it came out really nice. As it was for a diamond wedding anniversary I bought some diamond looking beads and also ruby red diamond shape ones to match the flowers as those were the flowers in the original bridal bouquet.

My hands were sore for the next day or two as you need to apply some serious pressure on the pliers when you make them, but it looked just like the photo so it was worth it and much better than buying a generic one online. You can also make pretty wire hearts and stars for the toppers so I think I will practice them next. I was going to make diamond sweets...but the liquid sugar melted and pretty disformed my moulds! So I quickly gave up on that idea and dedicated more time to the flowers. 

Next I made the flowers. I made these from red Florist Sugarpaste, and the Wilton Gum Paste Flowers making set I bought recently. It took me a few goes to get the ruffling right on the carnations but once I got it I thought they came out really well, the trick is to make them really thin. They dry so quick I don't know why I haven't been brave enough to try it out before rather than trying with fondant all of the time. the only problem was that when they dried their colour was lighter than it first was. All I did was mix up some Christmas Red Sugarflair colouring paste with a bit of water utnil it was like poster paint consistency and simply painted the colour on and let them dry overnight. They came out really vivid and quite shiny too.

The rest of the cake was easy in comparison. I can be a bit of an angry baker! But I was fairly calm throughout! I made two large rectangle cakes, sandwiched them jam and a huge helping of buttercream and freehand cut the diamond shape. It was going to be portrait but the writing on top was too large. I covered the cake in ivory fondant and did another diamond in white for contrast. I used another gadget here too. To do the writing I used my Make Any Message Wilton set. You choose you're message, slide the letters into the holder and gently press down onto the fondant, you can then pipe the writing on nicely and not worry about it coming out in a straight line or not looking uniformed. This is great for me as my handwriting isn't always the best, especially when there's pressure to get it perfect! I did the writing with royal icing. I've never made my own writing icing as I always thought you needed meringue powder. But I just mixed the royal icing sugar with water, very little, to the point it's so thick it wouldn't run anywhere. I coloured it with Christmas Red and piped it on. I can't actually believe how good it looks, because if you make a mistake with red on white there is no going back! I used my Tala Squeezey decorating bottles again and changed the nozzles for a tiny writing one. I also used these for the plain royal icing around the base of the cake and the diamond shape.

As you can see it's not on a usual cake board. I couldn't find one big enough!! I had to get my brother to make me one.  I finished it all off my sticking the topper in the top in a posey pick, stuck the flowers on with royal icing and tied it all up with some red ribbon from the local greeting card shop. Does anyone else find it hard to get ribbons on without them being a bit slack and needing pins?

Sorry about the essay! There was a lot of prep that went into this cake so a lot to talk about! Hope I haven't bored your to death with my technical jabber. As a friend told me it's nice to have a traditional cake on your portfolio, so there you go, it's not just giant cupcakes and pink buttercream...though I do have one to do tomorrow! :)

Nom! x Pin It Now!

Friday 21 October 2011

Mary Berry's Sachertorte

I've seen this cake around is a few different cookbooks...but I used to always think if a slice of cake wasn't massive, it wasn't worth having - well how wrong was I? I've soon learnt that a smaller slice can pack a powerfully gorgeous punch!

This chocolate cake is said to be invented in Vienna by the chef Franz Sacher in 1832. It traditionally has one layer of rich moist sponge, topped with a layer of set apricot jam and they covered in beautiful ganache. These cakes have a tough reputation as they can be difficult to master to get the right texture and richness. They're meant to be lovely and moist but not underdone. The Ganache has to be silky and shiny. You also have to be able to pipe 'Sacher' onto the top in milk chocolate which some found difficult on the show.

I followed Mary Berry's rule and piped it in one go like handwriting. I always worry about my handwriting, I scribble a lot because I'm used to writing so quick, so I do try practice when I do stuff like this and try not to rush it. Also I didn't heat the chocolate until boiling so it was thicker and easier to pipe. I was disappointed when I realised this wasn't in the 'How To Bake' book from The Great British Bake Off by Mary Berry, but I soon managed to track it down online, and also I aslo got some great tips from The Masterclass they've been airing on BBC2, Thursdays at 8pm.

To do the piping I used one of my Tala Squeezey bottles you saw in one of my previous Baking Buys posts. I thought this might be easier to use than an actual piping bag and boy was I right.  I had such amazing control with it and found it so easy to write with. I will definitely be using this for all future writing tasks and even just decoration. It was a bit of a pain to clean just due to the nature of bottle, but as it was chocolate I let hot water and washing up liquid stand in it over night, and in the morning gave it a good shake and it washed out clean. 

This cake took quite a long time with cooling time etc,  but I think it was completely worth it. I also wasn't sure how I'd feel about the apricot jam...but in an odd way it reminded me of a Jaffa Cake, that's probably a bad thing to say isn't it? ...but it did! The ganache didn't take long to cool at all and I did put the pan in a sink full of cold water to speed up the process, it does cool fast when on the cake, but if you do need to re-smooth it (like I did!) then just run your pallet knife under hot water, wipe clean an you're ready to smooth over. I'm sure I could have got the top even smoother, this way does look more homemade.

 Ingredient:
  • 140g/5oz plain chocolate
    • 140g/5oz unsalted butter, softened
    • 115g/4oz caster sugar
    • ½ tsp vanilla extract
    • 5 free-range eggs, separated
    • 85g/3oz ground almonds
    • 55g/2oz plain flour, sieved
    For the topping and the icing

    • 6 tbsp apricot jam, sieved
    • 140g/5oz plain chocolate
    • 200ml/7fl oz double cream
    • 25g/1oz milk chocolate

    Preparation method

    1. Preheat the oven to 180C/350F/Gas 4. Grease a deep 23cm/9in round cake tin then line the base with greaseproof paper.
    2. Break the chocolate into pieces, melt gently in a bowl set over a pan of hot water, stirring occasionally, then cool slightly. Beat the butter in a bowl until really soft, then gradually beat in the sugar until the mixture is light and fluffy. Add the cooled chocolate and the vanilla extract and beat again. Add the egg yolks, then fold in the ground almonds and sieved flour. The mixture will be quite thick at this stage.
    3. In a separate bowl, whisk the egg whites until they are stiff but not dry. Add about one-third to the chocolate mixture and stir in vigorously. Gently fold in the remaining egg whites. Pour the mixture
    into the prepared tin and level the surface.
    4. Bake in the oven for about 45-50 minutes, or until well risen at the top and the cake springs back when lightly pressed with a finger. Leave to cool in the tin for a few minutes then turn out, peel off the paper and finish cooling on a wire rack. Mine was a little to risen, a while it did sink a bit, it wasn't enough so I turned it upside down after 5 mintues to level it, and then turned it back and left it to cool.
    5. To make the topping, heat the apricot jam in a small pan and then brush evenly over the top and sides of the cold cake. Allow to set. (See it does look a bit like the jelly part of a Jaffa Cake!)
    6. Make the icing by breaking the plain chocolate into pieces. Heat the cream until piping hot, remove from the heat and add the chocolate. Stir until the chocolate has melted, then cool till a coating
    consistency. Then pour the icing on to the centre of the cake. Spread it gently over the top and down the sides, and leave to set.
    7. For the ‘icing’ writing, break the milk chocolate into pieces then melt gently in a bowl set over a pan of hot water. Spoon into a small piping bag or bottle and piper the word 'Sacher'' onto the top in one go, not letter by letter.

    Serves 12 Pin It Now!
  • Wednesday 19 October 2011

    This Week In Giant Cupcakes

    Now I'm seriously entering cake time, there will be one nearly every day for a couple of weeks, next week in particular so I'm trying to take it a bit easy this week and prepping some bits for other cakes I have left to do. In the last week I have had two to do, one for a 21st birthday and one for a 50th, both girly! This one was for a girl's 21st birthday, and the theme was pink and butterflies. I get so many orders like this and I just love it. It gives me a reason to go to town on cake colourings, cut outs, shimmer and sometimes even glitter! I think if I had to make girly pink cakes all day I really wouldn't mind, but sometimes it is nice to get something different come up, so Halloween will be the time for some darker treats...

    This one was made with my classic Victoria Sponge recipe using jam to stick the icing to the bottom and filling the middle with lashings of pink buttercream. I prefer to use jam for the bottom of the cupcake so you see the indents of the 'case' part which you don't get as much with buttercream as they will work a bit like filler and smooth over these grooves which can ruin the effect.

    I love the look of the white bottom and pink top, so to give it a bit of contrast I used my smallest butterfly plunger to make white and lilac butterflies, the lilac I coloured with Sugarflair Grape Violet but only a little to get a light colour as it can go bright purple if you add too much. To make the plain white ones a bit more girly I dusted them with light pink cake glitter I bought from my local Garden Center for about £2.79 I think, they have just started to stock cake decorating supplies so I can't resist the odd purchase. You all know I love eBay but sometimes if I need little bits like this in a flash to garden center is the best option. They also have great ribbons which is where I always get mine from as they're always quite cheap.

    To match I cut out 21 in white and also dusted them in the cake glitter.  I aslo added a white and glitter butterfly for under the 21. I didn't want to over-do it and I think the glitter was a really cute touch. I did a pink gingham ribbon around the bottom, I try to always do these on cupcakes where the design allows as it makes them look a bit more like a present.


     The next cake is the 50th birthday one. This is a classic chocolate sponge recipe, I always use Bournville cocoa powder, it just tastes nicer and it always comes out quite dark which isn't always the case with some powders.  They wanted a pink/white/black theme which always looks nice I think. As it was for a 50th birthday I didn't want to go too Barbie girly, just pretty. They wanted lots of bows, stars and hearts which is a really cute selection.

    This cake also gave me a change to use some of my new heart and star plungers too! again I did this one with a white base, as I think black would have been too dramatic, with a pink top with white and black decoration. I also added to large 50s in white fondant on the front and back.

    I used a few different sizes for a bit of variety. I hadn't used black on a girly cupcake before and I'm really pleased with how it looks as it gives it a more of stand out effect and has good contrast. To colour the black I used Sugarflair liquorice, and the pink I used Claret, I do have a Pink one, but I find I like the Claret colouring more, always use what you trust.

    I love the bows on the bottom, I wasn't sure how to incorporate them to begin with and then thought about what I'd like if it was me, and then though they would look nice almost like bunting, framing the bottom of the top making every other one black. I didn't use any glitter on this one leaning more on the decoration.

    And to finish of course another ribbon! This time a black gingham one to tie in with the theme. I use pins with the colour balls at the end to keep the ribbon in place as I think it looks nice than plain pins and you notice them more making them that bit safer!

    This take me up to a total of 20 giant cupcakes that I have made this year, I still have at least 4 more to make in the next month I think...I wonder how many I will be up to by Christmas!


    Pin It Now!

    Monday 10 October 2011

    The Classic Christmas Cake Recipe

    It's that time of year again where leaves start to fall, the wind gets chillier and it's soon time to make the Christmas cake. Traditionally you are meant to bake it 8 weeks ahead of time...and I have to be honest, I hate fruit cake, with a passion. But my nan is coming for Christmas and she absolutely loves it, and I do love tradition so why not. They are some really quirky and fun ways to decorate them now too so I will at least have fun with that.

    This recipe may not be as good as Nigella's but it's a classic in our family and as far as I know my mum has been baking from it for 38 years! So it's stood the test of time...and nan approved so you can't go wrong with that really. This recipe comes from  The Dairy Book Of Home Cookery, this book has been so used it's actually falling apart and used to belong to my nan before my mum got it so god knows how many times it's been sifted through. This is the book I go to when I want the good proper home cooking recipes that you don't need about 30 ingredients and 12 hours for, they're just great recipes that always work. I do have my own copy but it's more new looking and hasn't been covered in butter or milk yet so it still looks too pristine.

    I will actually try some of the Christmas cake this year, even though I hate marzipan I will give it a go. To make it a bit more fun we baked it in a heart shaped tin to revamp it a bit.

    Ingredients:
    • 225g plain flour
    • 1 level tsp mixed spice
    • 1/2 level tsp cinnamon
    • 1/2 level tsp grated nutmeg
    • 1 level tsp cocoa powder
    • 175g butter
    • 175 soft brown sugar
    • 1 level tbsp black treacle
    • 1 level tsp each finely grated orange and lemon rind
    • 4 eggs
    • 550g mixed dried fruits (currant, sultanas and seedless raisins)
    • 100g chopped mixed peel
    • 50g shelled walnut halves or blanched almonds
    • 50g chopped dates
    • 50g chopped glace cherries
    • 1 tbsp milk
    • 2 tablespoons brandy
    Method:
    1. Prepare  20cm/8inch round of square tin (or heart!)
    2. Sift in flour with spice, cinnamon, grated nutmeg and cocoa
    3. Cream butter with sugar, treacle and lemon and orange rind
    4. Beat in whole eggs, one at a time, adding tablespoon of sifted dry ingredients with each
    5. Stir in currants, sultanas, raisins, chopped peel, nuts dates and cherries and also the brandy (some say to soak it overnight but it can be a bit overwhelming when all you do over Christmas is drinking anyway! But you can if you want)
    6. Fold in dry ingredients alternately with milk
    7. Transfer to prepared tin and smooth top with knife
    8. Bake in center of slow oven (150 degrees celcius / 300 degrees fahrenheit - Gas mark 2) for 4 - 4 1/2 hours or until a skewer comes out clean
    9. Leave in tin for 15 minutes before turning out onto a wire wrack
    10. When completely cold, wrap in aluminium foil and store in airtight tin until needed
    11. Makes 20 - 30 portions
    12. Eat in 8 weeks! Nom!
    Obviously we won't be decorating it until Christmas time, so stay tuned to see the final design. Pin It Now!

    Sunday 9 October 2011

    Baking Buys

    Another pay cheque means another spending spree. I have to say I did go a little overboard this month, but I do have a few cake orders so I can justify it for once. You all know how much I love eBay now...all I can say is they took a lot of my money this week!

    They were all good purchases though, no rubbish. All investments as such and nothing too ridiculous..I don't think.

    As I mentioned in my last post, I bought the Gum Paste Flower Making Set from Wilton. It comes with 32 pieces; lots of different flower cutters, sponges to work on, a couple of tools and a book showing you how to make different flowers. I got it for only £12.88!  I tried some out in fondant in my last post which I think came out really well. I know you are supposed to use gum paste or sugar floral paste, it's really expensive though, does anyone know of any deals out there? I did get some for £4.50 from eBay which was the cheapest I could find.

    So as I just said I also bought some Squires sugar florist paste in poinsettia, I have a 60th wedding anniversary cake coming up so I wanted to try to make some carnations for that, so I bought some red gum paste. I've never worked with it before so I'm hoping it goes OK, I don't know what to expect really but I will of course document it :). I'm not really sure how much you have to use per petal or piece but I'm sure I can track down some tutorials online.

    On a lot of my giant cupcakes I am asked to make them really girly with hearts, flowers and stars etc. So I though I'd buy some plungers, similar to the butterfly ones in one of my last Baking Buys post. I got them in a set of three. The heart plungers came from eBay for £2.97 which is a bargain when they cost at least double in shops. The star ones came from T K Maxx which actually have some fantastic bakeware and accessories, I think it cost about £3 too.

    Whilst in T K Maxx I also picked up this Wilton Writing Set, I thought it would come in handy some people like more traditional looking cakes, and they all seem to have this kind of writing on them, very italic and a bit scroll like. I thought this would be good to get the writing looking really neat and uniformed while still a bit posh.  There were smaller cheaper sets but this one was just nicer, and cost £7.50 which I thought was pretty good as it's Wilton.

    Whenever I'm working with fondant I hate using water to stick pieces together, because as I'm sure a lot of you know - as soon as water touches that fondant, the sheen never goes! So I thought it was time to get some edible glue, so I can stick bits together without the risk of water dripping over the rest of the cake. I really hope this will be a good product and I think it would be really hand for cakes that need a lot of detail. This only set me back £2.29.

    I've mentioned a couple of times I have a big wedding cupcake order at the end of the month and I don't think I'll get all 150 on the perspex stand I've got. I have a couple of the 23 cupcake stands you see in shops...normally they are silver but I also have a pink one, so obviously I can't have them different colours. I'm hoping to do more orders like this in the future so I invested in another silver one as then I can display another 46 cupcakes which could make an amazing amount of difference to the final presentation.  I have seen them in local shops but haven't seen one recently so I turned to faithful eBay again and snapped one up for £5.49, not bad really I don't think!

    I have actually bought a couple of more things I've just bought, but I'll save them for the next post before I bore you all to death.. I think I may have a slight online shopping obsession I dread to think what the postman thinks!


    Pin It Now!

    Thursday 6 October 2011

    My Birthday Wishlist

    It's exactly one month and two days until my birthday, not that I'm counting! And to be honest I think I'm pretty easy to buy for, so this isn't a wishlist as such, in the way that I want people to buy me these things! It's more of like, in an ideal world of money and storage, I would love them :D So it's more for fun, but one day when I'm disgustingly rich and have a huge house, I can buy them all! A lot of what is featured will already have been on My Baking Wishlist, as I still haven't bought them!

    One has to be the rolling pin, I think it's quite extravagant for nearly £45, from  Not On The Highstreet but it's sooooo pretty. I want to roll nothing but pastry with it, they effect would look brilliant on a pie. I just really want a porcelain rolling pin too, I only have wooden ones.

    I have a bit of a mixing bowl obsession, I love them when I realised they came in more colours than just the plain brown and white, which I think it awful. I have a set of Joseph Joseph bowl which I love, and a beautiful bright red mixing bowl from Tesco which reminds me of a fireman's helmet. But the one I REALLY want is this lilac Mason Cash one from John Lewis.  It's £22 and so pretty I almost can't stand it, it just makes me want to bake a Victoria Sponge! I've seen it a few times but can never justify getting it as I already have a colourful one. But it is cute isn't it.

    OK my next one is one my lust list,  I've been looking at it for ages. I'm quite traditional and even though I don't have my own place I really want my own dinner service, I think they'd be great for my baking photography too. I love this set, again from John Lewis called Pipp. It's not actually stupidly expensive, prices start from £3.49, but if you wanted the whole set...it will set you back. I just love how it's quite traditional but with a modern twist, I love the floral patterns but it's not old fashioned at all. It comes in two main colours, blue and pink and the idea is you can buy bits from each colours and mix them so it'll look quite eclectic. Love it!

    I'm really into purple it's easily my favourite colour. So it's no surprise these caught my eye in Tesco . I also love Mock Croc so it's a double win. They don't look to bright in this picture but they're a gorgeous purple colour, and patent too just like a handbag. The only problem with this placemat as coaster is that it only comes in a set of four, so you'd have to buy two which is crafty as they're £10.50 a set...still love them though :)

    So the last thing on my dream list, and I'm sure you're expecting it to be a mixer - but even I can't ever expect one of those in my wildest dreams! - is an ice cream maker. I know summer is over, but ice cream is brilliant all year round and it would be great to make some great flavoured ones for Christmas. This one is a Kenwood one from Amazon for £19.97 which actually isn't too bad, again I can never seem to justify it if I don't actually NEED it, and I guess I don't. I have tried making it in the freezer before but I just can't get the hang of it.


    Images from:
    Not On The Highstreet, Tesco, Amazon and John Lewis Pin It Now!

    Tuesday 4 October 2011

    Girly Birthday Giant Cupcake

    I have a few orders of giant cupcakes over the next month or so, so you'll be seeing a few of them!

    This one was for a colleague's mum's birthday. I got a lot of free reign with it, just told to make it very girly and cute and pink, my favourite! I really love making girly cakes as I can go all out on them and love making them excessively pretty.

    As it was for someone's mum I didn't want to go too princessy, I tried to keep it cute but a bit more grown up. I'd recently ordered the Wilton Gum Paste Flower Making Set from a previous Baking Wishlist post...it will also be in my upcoming Baking Buys post as I've gone a bit spend-crazy this week! I decided to make some dasies, as to be honest these seemed the easiest as I only had fondant to work with and required minimal work as it was my first go. But they came out looking brilliant so I was really happy with them.

    Another item you'll be seeing in my Baking Buys post are the butterflies, made from rice paper I got them from surprise surprise...eBay! You have to cut them out though which was a bit fiddly, but the colours are nice and strong and they look really realistic! I placed them on the flowers so they looked like they had just landed on them. I didn't want to overdo the decoration as I do think that sometimes less is more.

    I decorated the bottom with crisp white fondant tied around with a pink gingham ribbon and bow. I need something nicer than pins to use to keep them in place, any ideas? I was thinking of using the ones with the balls at the end like the one on the front, not sure if you can get them in just one colour though as most sets have all kinds of colours in them.

    The top is decorated with pink buttercream coloured with Sugarflair's Claret colour and piped on with a large star nozzle from Tala, I'm struggling to find the rose ones in large? I also used one of the disposable piping bags - I wasn't sure about them to begin with but I have to say I absolutely love them now I've used them a few times!

    To finish off I simply used cutters for her name, kept it in white to match the base and left it there. I was tempted to carry on adding decoration but stopped myself before I ruined it! Pin It Now!
    Related Posts Plugin for WordPress, Blogger...