Showing posts with label sugarflair colouring paste. Show all posts

Wednesday, 7 March 2012

CMYK Mimeo Cupcakes

This week I was given a fun task by my work, so make some cakes for the launch UK Docs for Mimeo for all of the staff. Me and another lady were asked, I guess we're known for making the most cake! They needed to feed about 140 people, we decided on a big slab cake to feed 60 (which was nearly all eaten before I thought of getting a picture) and cupcakes, we reckoned on doing 70 cupcakes but threw in an extra ten in the end.


The obvious choice was to go for the Mimeo logo which feature CMYK, meaning the print colours Cyan, Magenta, Yellow and Key (black). I was a bit worried about how strong the colours would turn out as if they're representing print colours then I wanted them to be perfect.


Black icing can be a bit harsh so we had the great idea of using black muffin cases. I divided the cupcakes in three and do one batch of cyan, magenta and yellow. I got the cases from my local cake supply shop Sugar Daddy's in St Neots, it's like a treasure trove I love it. I also managed to pick up an Ice Blue Sugarflair paste for the cyan and some icing whitener which I thought could help the magenta brighten up.


For the sponge I made the Vanilla Cupcakes recipe from Hummingbird Bakery's Cake Days book, which is now my new standard cupcake recipe. I made the cyan batch of icing first, it took more colouring than I imagined as blue normally colours up extremely strong and always seems to develop after mixed so I'm really happy with how vibrant they turned out.  The yellow was easy, coloured with Melon sugarflair paste.


I left magenta for last as I find getting really bright pink colouring difficult. I used some of the icing whitener first which is really strange. You add some powder to a small amount of water so it turns into a paint like substance and add it in a bit at a time. I wasn't brave enough to make it completely white but it definitely lightened it a lot. I'd seen some liquid colouring in Tesco made by Silver Spoon. It's thicker than the normal liquid ones so I had more faith looking at the colour chart on the box that it would work better. It definitely worked better than the other pink I've tried but I'm sure I was mixing it for about 20 minutes (my poor mixer) but everyone commented on how lovely and light the icing was so it did it some good! I used about a bottle and a half of this colouring in a big batch of icing and I couldn't get the colour any stronger than what you see here so don't get the Pantone chart out it will never be magenta!

I seem to be favouring the Wilton 1M Wilton rose swirl nozzle, but I think it looks so nice it'll be my first choice for a while. I set them up on my clear cupcake tower which luckily held all of them and really represented the colours of Mimeo.  The cupcakes didn't last more than a couple of hours and I got some really nice comments on how light and tasty they were and that's all you can ask for really.
Pin It Now!

Wednesday, 19 October 2011

This Week In Giant Cupcakes

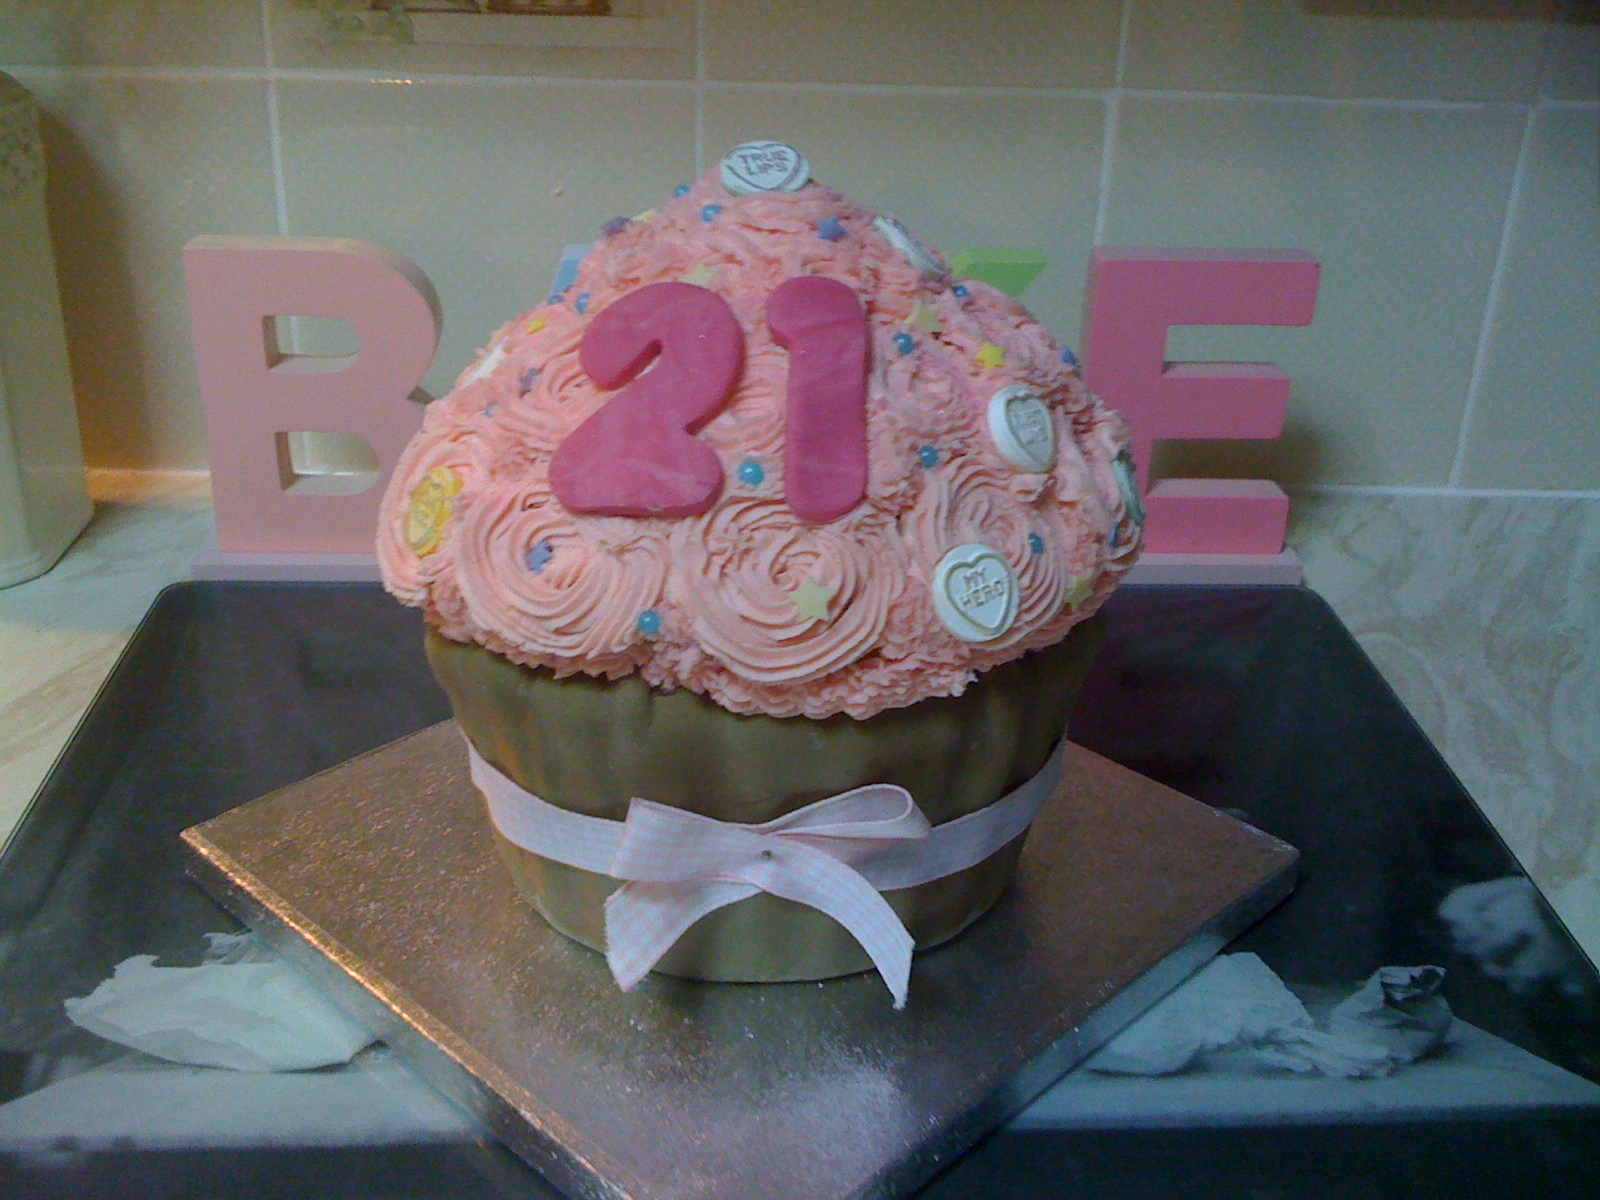
Now I'm seriously entering cake time, there will be one nearly every day for a couple of weeks, next week in particular so I'm trying to take it a bit easy this week and prepping some bits for other cakes I have left to do. In the last week I have had two to do, one for a 21st birthday and one for a 50th, both girly! This one was for a girl's 21st birthday, and the theme was pink and butterflies. I get so many orders like this and I just love it. It gives me a reason to go to town on cake colourings, cut outs, shimmer and sometimes even glitter! I think if I had to make girly pink cakes all day I really wouldn't mind, but sometimes it is nice to get something different come up, so Halloween will be the time for some darker treats...

This one was made with my classic Victoria Sponge recipe using jam to stick the icing to the bottom and filling the middle with lashings of pink buttercream. I prefer to use jam for the bottom of the cupcake so you see the indents of the 'case' part which you don't get as much with buttercream as they will work a bit like filler and smooth over these grooves which can ruin the effect.

I love the look of the white bottom and pink top, so to give it a bit of contrast I used my smallest butterfly plunger to make white and lilac butterflies, the lilac I coloured with Sugarflair Grape Violet but only a little to get a light colour as it can go bright purple if you add too much. To make the plain white ones a bit more girly I dusted them with light pink cake glitter I bought from my local Garden Center for about £2.79 I think, they have just started to stock cake decorating supplies so I can't resist the odd purchase. You all know I love eBay but sometimes if I need little bits like this in a flash to garden center is the best option. They also have great ribbons which is where I always get mine from as they're always quite cheap.

To match I cut out 21 in white and also dusted them in the cake glitter.  I aslo added a white and glitter butterfly for under the 21. I didn't want to over-do it and I think the glitter was a really cute touch. I did a pink gingham ribbon around the bottom, I try to always do these on cupcakes where the design allows as it makes them look a bit more like a present.


 The next cake is the 50th birthday one. This is a classic chocolate sponge recipe, I always use Bournville cocoa powder, it just tastes nicer and it always comes out quite dark which isn't always the case with some powders.  They wanted a pink/white/black theme which always looks nice I think. As it was for a 50th birthday I didn't want to go too Barbie girly, just pretty. They wanted lots of bows, stars and hearts which is a really cute selection.

This cake also gave me a change to use some of my new heart and star plungers too! again I did this one with a white base, as I think black would have been too dramatic, with a pink top with white and black decoration. I also added to large 50s in white fondant on the front and back.

I used a few different sizes for a bit of variety. I hadn't used black on a girly cupcake before and I'm really pleased with how it looks as it gives it a more of stand out effect and has good contrast. To colour the black I used Sugarflair liquorice, and the pink I used Claret, I do have a Pink one, but I find I like the Claret colouring more, always use what you trust.

I love the bows on the bottom, I wasn't sure how to incorporate them to begin with and then thought about what I'd like if it was me, and then though they would look nice almost like bunting, framing the bottom of the top making every other one black. I didn't use any glitter on this one leaning more on the decoration.

And to finish of course another ribbon! This time a black gingham one to tie in with the theme. I use pins with the colour balls at the end to keep the ribbon in place as I think it looks nice than plain pins and you notice them more making them that bit safer!

This take me up to a total of 20 giant cupcakes that I have made this year, I still have at least 4 more to make in the next month I think...I wonder how many I will be up to by Christmas!


Pin It Now!

Tuesday, 30 August 2011

Super Mario 5th Birthday Cake

So my little brother is a whole five years old, it only feels like a couple of years ago that he born a week after I moved down to Southampton for University.  And now he is five. Every year there is a new craze and obsession, we've had In The Night Garden, Peppa Pig, Toy Story and now Super Mario, in fact Mario was his favourite character from last year, but he loved that cake so much, and the games still that he wanted another cake like it for this year.

Last year he got a single tier cake with a Mario stencil on top and screenshots around the side as can be seen in my post here. Both that one and this year's one was for his bowling party (can you tell he likes the Wii?) And I'm not going to lie, but I do like having the best cake at the bowling alley as there usually is a couple of other parties going on. Last year my only competition was one of those caterpillar shaped cakes..this year someone too made a Mario cake....luckily (and not nastily.....maybe) they had a big fondant figure on top - but it was quite droopy looking although the birthday girl loved it. I am quite competitive and I like to have the best cakes....children's party or not - it's war!

So anyway, this year I thought I would up the game. I had to do better than last year. I decided to go for a two tiered cake, vanilla sponge and thick buttercream - I thought just buttercream rather than adding jam as with kids it can often get messy and the buttercream works as a kind of cement and give the outside a nice smooth surface for the fondant icing.  I liked the screenshot idea, so I wanted to do more of that and again better with a years experience on it.

Rather than a big Mario on top, I drafted in my brother Joe to help me, he's really good at illustration etc so I let/made him do Mario and I think he came out perfect! I did a lot of the outside decoration but again I made Joe add the finishing touches with the icing pen and help with the ideas and positioning of some of the detailing.

I covered the cake in blue fondant made with Baby Blue Sugarflair colouring paste, I then used a two different greens for the hills, Mint Green and Holly Green so try to show depth. Good plain old white made up the cloud, to get the cartoony 2D feel I used two or three circles rolled out and laid on top of eachother for a really billowy look. I didn't want it too look too busy, so I added a few of the block with question marks with coins above (which I then used the icing pen on to get some shading.) I also made the big bullet coloured with Liquorice colouring paste, and mixed this with some white to get the grey to make the shading.

I aslo made the flower coming out of the pipe, a shell and one of those brown mushrooms you have to jump on in the game (I don't know the technical gaming names! sorry!) We also added a big star in the sky as these feature a lot in the game, and I had a big patch of sky to fill! I got joe to draw faces on the clouds and star like they have on the game which really made the cartoon factor stand out.

I took about 8 hours all together to make the icings, ice the cake and then actually decorate! I obviously had to add the big number 5 on the front! His reaction was great when he saw it finished, considering he had actually seen it a bit earlier so there wasn't the big element of surprise. It came out a lot better than I imagined, he loved it, I'm happy I won the cake war at the bowling alley and now all I have to worry about it is.....what do I bake next year!?!
(bottom left picture is Joe, Josh and Me)

Pin It Now!

Sunday, 3 July 2011

This Week In Cakes

This week I had two cakes to make, luckily they were in my favourite form - giant cupcakes! I could make these in my sleep now and you can do so much with them so I love them.


I hadn't done a really girly one in a while so I was really happy when I got an order for a 21st birthday one. Lots of Love Hearts, pink buttercream, stars and even a cute gingham ribbon. The cake itself is Victoria Sponge with jam on the bottom part and more pink buttercream in the middle. I used chocolate brown Sugarflair colouring paste to make the case part, and claret Sugarflair paste for the icing. These really do give off the nicest colours and a little goes a long way. Both the number and the buttercream were made from the claret one, this just shows how deep you can get it by simply adding a bit more.

The next cake here is for Swavesey Primary School Fete to go into the raffle to win it. It's nice to help out where you can and there is no better way than with cake. The theme was 'treasure island' so I thought this was a good representation of it. Because the surface are isn't that massive on top there is only so much you can put on it before it starts looking silly, so I went for of course a treasure chest, made from fondant coloured with melon yellow and chocolate brown, I added some yellow stars to look like the brass studs and make it look a bit more special, I then added some random pieces of decoration to look like treasure. I also added some fondant coconuts, an 'X marks the spot'  and even a palm tree. I discovered making a palm tree out of fondant was almost impossible, so I just made the trunk out of fondant supported with cake wire. And for the leaves I stripped green liqourice, flattened the green cut offs, cute them into palm leaf shapes and stuck them on top just slightly going through a piece of cake wire to keep them together. It was a bit of a mission but I love how it looked so it all worked out. Oh yes and the sand, I mashed together a bag of Malted Milks until they looked like fine sand and covered the top in them (which was subsequently covered in vanilla buttercream), this cake was also made of Victoria Sponge and the bottom was covered in baby blue Sugarflair paste with a few extra stars to give it a treasure feel. Pin It Now!
Related Posts Plugin for WordPress, Blogger...