Showing posts with label girly cake. Show all posts

Monday, 23 July 2012

Chocolate 24th Birthday Giant Cupcake

There's gonna be a few of these giant cupcake posts this week, I haven't done any in what seems like a million years - so I'm happy I've got a few to put up.


Of course I still carried the same theme through and made a chocolate sponge topped with chocolate buttercream, the smell driving it over there was heavenly! 

Now this cake was made before I went on holiday, and for one of my oldest friends 24th birthday, Vici. Last year I made her the chocoholic cake, but it was quite massive and she wasn't able to finish it all! So this year I made a more reasonable sized giant cupcake, still loads left over after our aptly named 'cake o'clock' feast.

I'm really loving the chocolate and pink theme at the moment, if you can tell! I made pink fondant for the bottom and decoration with Claret Sugarflair colouring paste, feeling much braver since my last attempt with the textured rolling pin I gave it another go. And it worked! For decoration I made fondant rolled roses out of ivory fondant with pink leaves using a plunger cutter.

Needing more delicate lettering I decided against the blocked numbers as they looked a bit clunky on a little cake, instead I made them by hand with fondant so I could curl them into a curly font.


I also added some white and pink sugar pearls, white chocolate stars and an insane amount of edilbe cake glitter, you can never have too much!! All tied up with a cute pink bow and it was ready to eat, nom!


Giant cupcakes are a great present to give, although figuring out how to cut them up can sometimes be challenging - we always get the hang of it though :).

Pin It Now!

Tuesday, 8 May 2012

Pink and Ivory 30th Birthday Cake

As I said in my last post this weekend was my sister-in-laws birthday, so of course she got a cake! I've been so busy lately I've not been able to make many so it's nice to have time to actually do a proper cake.

I love making two tier cakes, they're great to give as presents and you can have lots of fun decorating them. I recently bought a textured rolling pin I've been wanting to try out, you'll see this soon on a Baking Buys post. I managed to get my hands on some ivory fondant, I do have ivory colouring paste that I could have used, but if I see it I usually try to pick some up it looks quite pretty next to pink. Which of course is the other main colour, I've become quite obsessed with this colour combo, if you haven't noticed. As this was going down the girly route I thought I'd make it extra girly by adding some cameos. They can be a bit of a pain as i only have one mould at the moment but my new favourite shop Sew White has informed me they will be stocking them soon so hopefully the process will speed up some!

So for both tiers I rolled out the fondant and used the rolling pin to make the spiral patterns, I've learnt that you need to press fairly firmly or the pattern smooths out a bit when you smooth it on the cake, and don't try to roll backwards afterwards or it'll all be destroyed!!


For the bottom I cut out some pink hearts and using white royal incing piped pearls around the edge and the letter 'L' in the middle for her name, Lindsay. For extra detail I made strips of fondant ribbon in between the hearts and made a pink fondant bow the night before so it could dry and not fall to pieces, think I'm starting to get the hang of these bows now!

For the top tier I again cut pink fondant hearts and made a pink and white cameo inside. Again piping pearls around the cameo to add a bit more definition, I love how sweet and detailed they look! I think the spiral patterned fondant looks really nice and effective against the pink and finishing with the gold ribbon around the bottom of each tier really topped it off I think giving it quite a vintage look.

The cake went down really well after a night of drinking, as you can see it ended up covered in streamers from party poppers and devoured over the next two days, nom indeed! I also have to give credit to my mum for the actual baking of the cake as I was too busy she helped me out one afternoon , we're quite a good team!

Nom! Pin It Now!

Sunday, 22 April 2012

Tom Hardy Heartthrob Giant Cupcake

This week was one of my best friends' birthdays, the big 21! I've known for a long time what cake to make her, it really was a no-brainer.


To say she likes Tom Hardy (from This Means War, Inception, RocknRolla) would be a serious understatement. I just had to get him on the cake, after using ricepaper for the One Direction cake I did recently I thought this would be the perfect way, and then she gets to eat him, perfect!


Finding a nice image I used Photoshop to rub out one of his tattoos and replace it with her name in a fancy script, I have to say it does actually look realistic.

The cake itself is vanilla with chocolate buttercream. The sponge is marbled with pink too for some extra girlyness. I though the only way to really do this cake was in a teen heartthrob fashion, like something you'd have in the back of your diary at school.


The 'case' is covered with pink fondant, coloured with Claret Sugarflair colouring paste, I then used the off cuts to cut out the hearts, butterflies and stars too. As I said the buttercream is chocolate, I've lost my 1M Wilton nozzle (cries!) but I have been abusing it recently so went a bit old school with a normal swirl nozzle which actually did look really nice. I like using Green & Blacks cocoa powder, the pigment is so dark is really colours up nicely and it made my car small INCREDIBLE when I drove it over (it was actually quite lucky to survive the trip - nervous driver).
I thought it would be best to literally just cut him out and place him on the top, so it looks like he's coming out of the cake. I did then pipe buttercream onto the bottom of the picture so it didn't look too Art Attacky. After placing him on the front I placed a big pink heart on top and piped 21 onto it. I then dotted the pink hearts and stars around the picture with a couple overlapping. I also added some white chocolate stars to add another girly, and it fitted nicely in to the theme.


I mirrored the decoration on the back and gave the whole cake a generous dusting of pink cake glitter.  To finish it off I tied it up with a chocolate coloured ribbon making a bow at the front. I'm glad she liked the cake, I also used the image for her birthday card from Moonpig so she can keep him forever!

Nom!


Pin It Now!

Wednesday, 21 March 2012

Pink and Chocolate 30th Birthday Cake

It has certainly been all about cake in the last two weeks and I have to say I'm knackered! I've had many nights of broken sleep waking up with crazy lazy panic thoughts about the cakes - anyone else? Although I have absolutely loved all of my recent creations so it was all worth it in the end. I started with my pink and white cake pops, Manchester United giant cupcake (blog post coming soon) and this week I had my friend's 30th birthday - a great reason to make a nice fancy cake and try out some new techniques, as if I need an excuse!


It's been ages since I've done a big proper cake so I couldn't wait to get stuck in. The cake itself is a two tiered vanilla and chocolate sponge cake with chocolate buttercream. She loves chocolate so it was the only choice really.


I 'became' Peggy Porschen (or at least I told myself I was!) and decided to keep the chocolate theme but make it a bit more girly (surprise surprise my favourite theme! :D) with using pink fondant icing. The bottom tier is pink with chocolate brown circles, decorated with an italic 'L' for Lisa and polka dot royal icing decoration around the edge.

I have to be honest and say the top tier nearly didn't make it (it nearly went in the bin!), I for some reason just couldn't get the icing to sit on it nicely without any folds - it was driving me mental! I then had the crafty idea of doing the 'suitcase' look to cover up the fold and give it some cute detail. I made up some 'leather' fondant straps and gave them seams with a cocktail stick, luckily they matched up perfectly to cover the bits I didn't like.  I'm quite obsessed with piping detail at the moment so couldn't resist adding some cute royal icing designs in-between the fondant straps.


I wasn't really sure what to do on the top, I didn't really feel like a cake topper would look right but then I had the genius idea of adding her favourite chocolates...Ferrero Rocher! I did initially want to pile them up like in the advert but it looked a bit silly so I thought just to dot a few around symmetrically, and do some more polka dot piping in a circle around the top of the straps to frame the chocolates.


As you all know by now I love adding bows to cakes. I've always used real ones but this time I thought I'd have a go at making a fondant bow which I've never done before. I let them dry for two/three evenings (honestly I can't remember which I think I might be slightly hysterical from all the baking) and it worked brilliantly which I really didn't think it would. I ran some more fondant around the end of the first tier at the bottom and stuck the bow on the front with two extra ribbon pieces running down the front. I'm not so sure I could do this ribbon too much on a giant cupcake, but on bigger cakes I think I'll be doing this a lot now! I would suggest making a few bows, I did, as I've heard horror stories about them collapsing!


The cake went down really well she loved it which is all that matters :D I got some really nice comments about it too, I seem to turn up every couple of weeks with a cake for someone's birthday so they're getting quite used to it now, so expect many more in the future!

Pin It Now!

Sunday, 3 July 2011

This Week In Cakes

This week I had two cakes to make, luckily they were in my favourite form - giant cupcakes! I could make these in my sleep now and you can do so much with them so I love them.


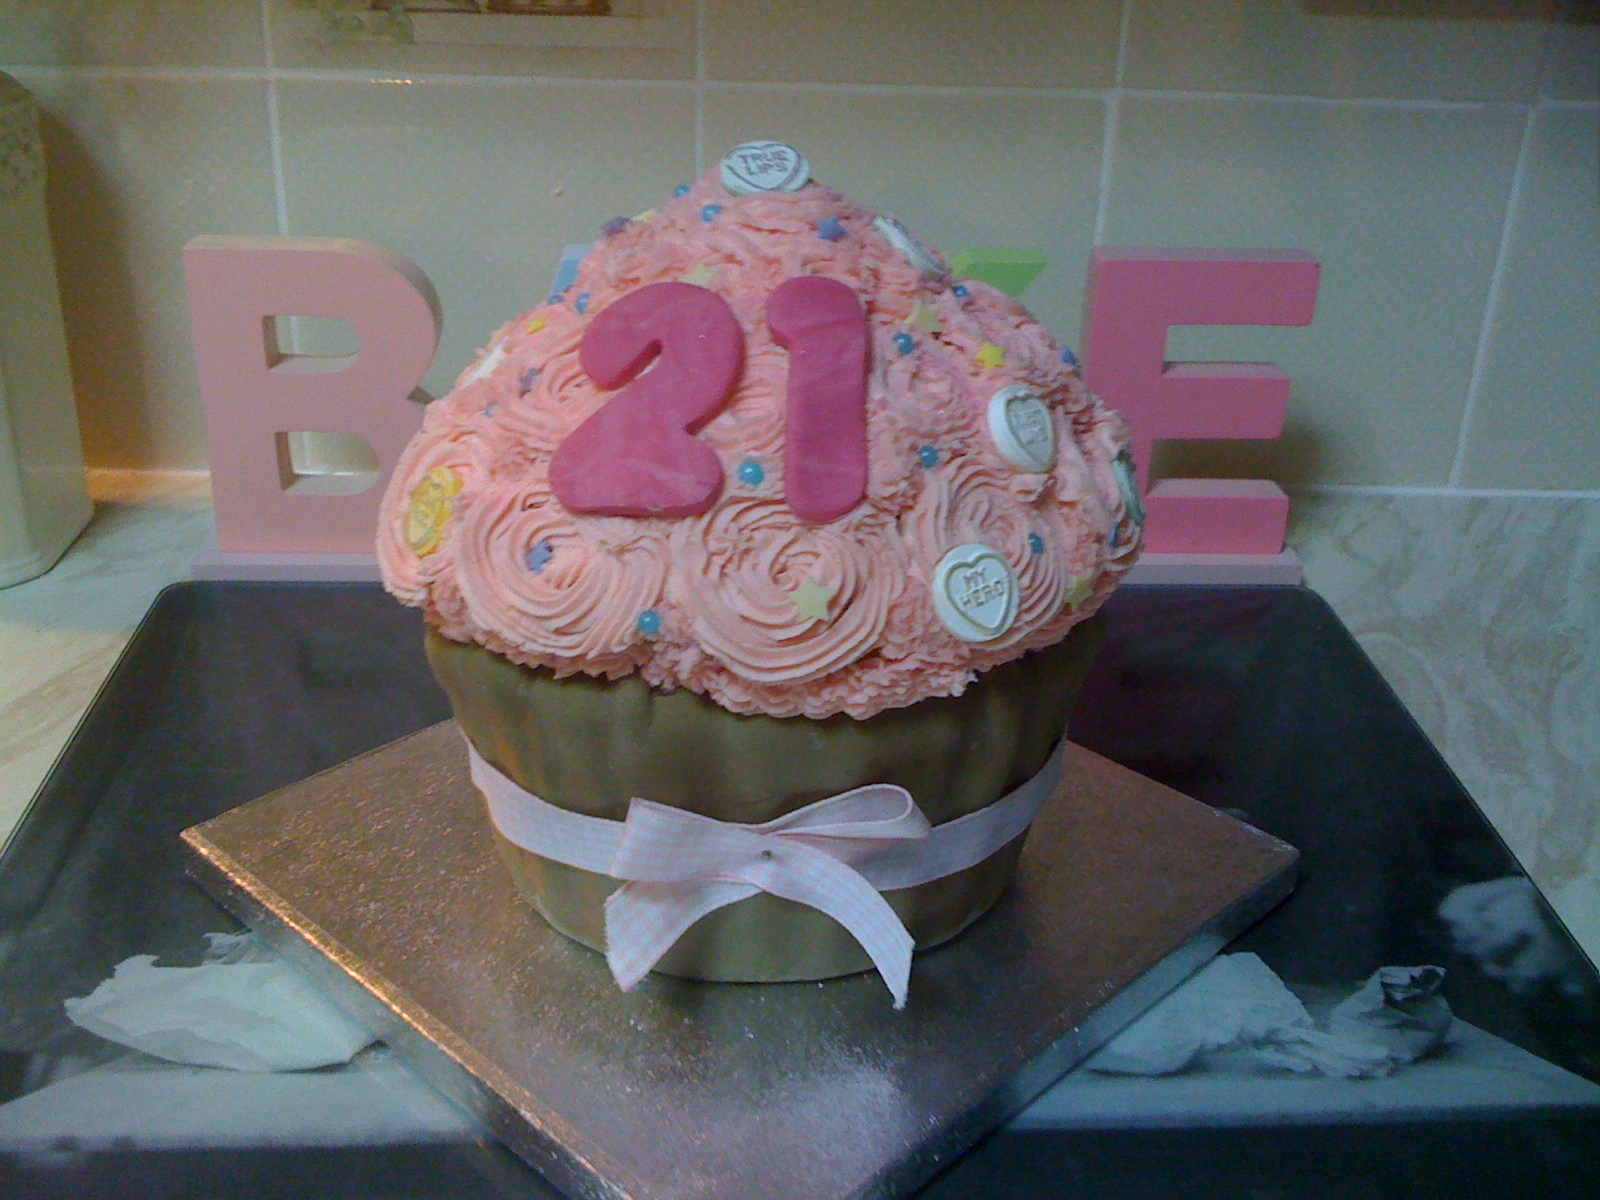
I hadn't done a really girly one in a while so I was really happy when I got an order for a 21st birthday one. Lots of Love Hearts, pink buttercream, stars and even a cute gingham ribbon. The cake itself is Victoria Sponge with jam on the bottom part and more pink buttercream in the middle. I used chocolate brown Sugarflair colouring paste to make the case part, and claret Sugarflair paste for the icing. These really do give off the nicest colours and a little goes a long way. Both the number and the buttercream were made from the claret one, this just shows how deep you can get it by simply adding a bit more.

The next cake here is for Swavesey Primary School Fete to go into the raffle to win it. It's nice to help out where you can and there is no better way than with cake. The theme was 'treasure island' so I thought this was a good representation of it. Because the surface are isn't that massive on top there is only so much you can put on it before it starts looking silly, so I went for of course a treasure chest, made from fondant coloured with melon yellow and chocolate brown, I added some yellow stars to look like the brass studs and make it look a bit more special, I then added some random pieces of decoration to look like treasure. I also added some fondant coconuts, an 'X marks the spot'  and even a palm tree. I discovered making a palm tree out of fondant was almost impossible, so I just made the trunk out of fondant supported with cake wire. And for the leaves I stripped green liqourice, flattened the green cut offs, cute them into palm leaf shapes and stuck them on top just slightly going through a piece of cake wire to keep them together. It was a bit of a mission but I love how it looked so it all worked out. Oh yes and the sand, I mashed together a bag of Malted Milks until they looked like fine sand and covered the top in them (which was subsequently covered in vanilla buttercream), this cake was also made of Victoria Sponge and the bottom was covered in baby blue Sugarflair paste with a few extra stars to give it a treasure feel. Pin It Now!

Wednesday, 23 March 2011

Birthday Cakes!

Here are some of the birthday cakes I haven't got round to putting up or what got lost in my deleted blog!
Just a few of quick ones!

The Russian doll cake I made for one of my work friends that were leaving - one day we will travel around Russia drinking vodka! I based it on my actual Russian doll and I think it came out actually really pretty!


One of my biggest cakes was for a 40th birthday, a football fan - obviously! So while they didn't want a specific football type cake I suggest the pattern in the birthday number, and it came out really great!
Girly cakes are some of my favourite ones to make! It might have something to do with all the pink icing and piping! this one was an order for a very girly girl who loved pink and sweets! 
Another week - another giant cupcake! I hadn't done a lilac one before which was great and lit looked really good against the chocolate!

Pin It Now!

Wednesday, 5 January 2011

Seriously Girly Birthday Cake!


OK, I have been bad with posting over Christmas, so I'll make up for it and catch you up. Since I last wrote it has been my best friends birthday. She has been my best friend for the past 9 years so she deserved a brilliant cake as a little surprise!

I bought a lovely book called Cake Chic over Christmas and all of the cakes were impossibly pretty and girly, and I couldn't decide which one to do so I chose a few and merged them. Inspired by cameo cakes I ordered a silicone mould off eBay.

So for the seriously girly cake I made a two tiered victoria sponge cake with pink raspberry buttercream. I iced it with fondant coloured with Sugarflair paste in Claret.

For the cameos I filled the mould with white fondant so it covered the whole of the mould on the outside too, then placed it in the freezer for 15 minutes. When frozen I popped it out and cut around it so it was in an oval shape. And repeated this about 8 times. For the frame and bows I mixed cocoa powder into white fondant and added a little black icing to get a darker brown. I also had icing dots to add on the brown icing frame, but did this when on the cake as they would get ruined when pressed onto the cake. I then piped the pearls on, did some looping piping inbetween the cameos and adding some silver balls to make it a bit fancy. These went onto the bottom tier.

For the top I used a button effect. Mixing separate colour of pink, chocolate and plain in icing, I rolled the icing out and using different sized icing nozzles, cute out circles, then using a smaller one I indented an outline on the cut out to give the button look. Then I pushed a toothpick in four times for the holes, and there you go buttons.

For extra effect I made some lilac icing and rolled it out into strips, and using a toothpick I made a stitch pattern along the sides so it looked like ribbon.  Then laying the ribbon over the top tier so it looked like a wrapped up present I put four buttons inbetween each ribbon piece, and also on top inbetween and then one on the join. I did make a bow to put on top but it broke!

I then went for some old school fancy piping to look like pearls inbetween the ribbons. It look ages! But happy as it looks cute! At the bottom of each tier I piped more pearls around the base so it looked a bit like a necklace. I then dusted it all with shimmer so it looked glittery! Pin It Now!
Related Posts Plugin for WordPress, Blogger...