Friday, 30 December 2011

No Bake Chocolate Orange Marbled Popping Cheesecake

New Year's is upon us, and of course so is another feast. In my family you 'go big or go home' as the Americans say and as we haven't cooked a big meal ourselves yet all of Christmas we are taking over New Year's instead with a big turkey dinner England style which is tradition here for this holiday.


So of course I couldn't leave out dessert. As I'm in a kitchen that isn't my own I thought I would go for something easy that didn't need baking but would still taste immense. I love cheesecake, I would eat it every day if my heart would allow so I made an extra indulgent one for the feast. Chocolate orange marbled popping cheese cake in fact!


I made the filling in two halves, one with the juice from an orange and the other with melted chocolate and even more chocolate grated into it for some texture. The chocolate shards on top is simply melted chocolate mixed with orange popping candy, I would have added it to the non chocolate half but this popping candy changes colour...into green...and I thought the mouldy look would probably not be the best...


I also added these cute little chocolate shapes, you get them a lot here on their cakes in bakeries and can get them in the shop. As I use a lot of Norwegian recipes they feature a lot and I'm always gutted when I have to leave them without. I think I'll stuff my hand-luggage with them before I go back :D

Recipe:

  • 200g chocolate digestive biscuits
  • 50g butter, melted
  • 300g cream cheese
  • 250g Crème Fraîche
  • 25g caster sugar
  • 1 pack orange popping candy
  • 200g dark chocolate
  • juice of 1/2 orange
Method:
  1. Crush the biscuits in a plastic bag, bash it to smitherines until it's like breadcrumbs. Don't worry if there's some lumps left they only add chocolatey texture :)
  2. Chuck them in a mixing bowl and add the butter and mix, press into dish or springform cake take, about 8inches. Leave to chill for 15 minutes, as it's about -2 here I put mine outside in a bag!
  3. Mix the cream cheese, crème fraîche and sugar until smooth and beautifully soft.
  4. Divide into two bowls, melt the chocolate and add 2/3 into one half of the mixture and stir like crazy.
  5. Mix the popping candy into the remaining chocolate and spread out onto baking paper on a plate and place in the fridge until hard.
  6. Add the orange juice to the plain mix, you can always add more if you don't think the flavour is strong enough and mix until incorporated.
  7. Add dollops of each mix in the dish so the colours are mixed up, not too much chocolate in the same place and same with the plain.
  8. Using a palette knife marble the two colours together and smooth out a little.
  9. Take the popping candy chocolate out of the fridge and break up into shards. Stick these in the cheesecake and add the chocolate shapes, or any other decoration you have to give it some va-vav-voom!
  10. Chill...I do mine overnight but I'm sure about 3 hours would be fine.
  11. Eat! Nom!

Pin It Now!

Thursday, 29 December 2011

Halvorsens Conditori, Oslo - The Best Place In Oslo

It's been a busy week with coming to Norway, Christmas, visiting my nan everyday. But one morning when we weren't able to go visiting we thought we'd go to our favourite place while we had the time.


Halvorsens Conditori, it's my nan's and mum's tradition that I was let in on a couple of years ago, a sandwich will easily set you back £9.00 but they are worth it, and everything does actually cost more here so when you live here it isn't so horrific. They also have the best coffee in town so my mum was happy.


While coffee doesn't interest me at all, you all know cake does! It's standard to have a sandwich, a pot of coffee and a slice of amazing cake. It all costs what you would spend on a regular dinner out, not exactly a Boot's meal deal, but as we only get to do it once or twice a year it's so justifiable.


The cake choice is pretty big, Norwegians love their slices of cake and I have to say for me they are the best in the world, nothing has beaten it yet. The place itself is gorgeous. Huge windows, chandeliers the lot it really does feel special.


I also love that you can buy larger cakes their for most occasions. You get your standard Blødtkake (below, the ones on top shelf) which is basically a national cake. But not for me as it's covered in marzipan which they are crazy for here but I hate it, so while I wouldn't buy a slice if there's some at a party I'll happily just peel that layer off and eat the three/four layers of cake and cream.


You could also buy Kransekaker which is an almond cake made up of rings they famously have on their national day and at any celebration. At this time of year they're usually decorated in mini Norwegian flags and small crackers.


I love the cakes at the top, the dress cakes. Although instead of using Barbie doll tops like most these are made like Victorian ladies, I actually love them I wish I had a reason to need to buy one! They're so pretty I must have looked like a crazy lady taking pictures constantly.


As we were leaving I noticed the window display which puts any gingerbread house I have ever made to shame and makes me want to camp out there until they teach me their ways. One day, I WILL make something like this!


Pin It Now!

Monday, 26 December 2011

Gingerbread House Failure!

I know we don't like to show them off too often, but cake fails are important to remember, they happen to all of us and can often be quite funny. I do need to make a whole post dedicated to them because sometimes, things just go wrong.


Last year I made the gingerbread house below. I loved it, we make one every year and was looking forward to getting more creative with one this year, stain-glass windows, maybe a porch...that sort of thing. With last year's one I even made the board a little festive with sifted icing sugar and chocolate Matchsticks with a dollop of icing on top for effect.


The one I tried to make is slightly different...basically it fell apart! We tried to all of the gingerbread in a bit of a rush and it shows, some bits were too soft, some too brittle...a shambles basically which is odd as we've never failed at one before. The stain-glass windows were brilliant, made with smashed up Fox's Glacier Mints...but the fruit ones. I used heart cut out windows as I thought that would be cute and stole the idea of framing them with mini candy candy canes from a fellow blogger. I even cut a whole out the back of one of the sides so I could slip in a tea light to shine through the 'glass'. As you can see I usually prop them up until dry with whatever household objects I can find that fit.


I covered the roof in giant Milkybar buttons to look like tiles, this look amazing...but was pretty heavy! This didn't help really when it came to it. Soft gingerbread + heavy chocolate = destruction. It actually stood completely fine until I came to finishing the decoration, I could have decorated the sides first but wasn't really sure how I wanted to do it so I'm glad I didn't waste any time doing that! :).  So I went to move it to a different table, that's when I notices it started to sink....this is when I went to support it only to realise that there was no way at all I could save it, for as soon  as I were to let go it would slowly die....and it did. In the end I just had to let it happen, I was annoyed I have to admit, but as we're away all of Christmas I suppose it doesn't matter, alas it just wasn't meant to be.


But there is a sliver lining, I said how much I hated that the edges of my gingerbread house never end up completely straight and wished you could get cutters. Of course Norway is the land of gingerbread and we were my second cousin's house today where she happened to have two sets! So I got given them both, heaven! I will give it another go, Christmas or not I shall find a reason, so stand by for gingerbread house take 2. Pin It Now!

Sunday, 25 December 2011

IT'S CHRIIIIIIISTMMAAAAAAASSS!

Merry Christmas and God Jul!

As Christmas it a bit all over the place this year I though I would catch up with some blogging as I've been a bit rubbish with everything going on. - On a side note, I have a giant cupcake featured in Love Baking magazine this month, so please check it out!

As you know I am in Norway for Christmas and celebrated mainly on Christmas Eve with more celebration today. It was amazing to wake up to a blanket of snow this Christmas morning thinking of everyone in England opening their presents. I did manage to catch the last of my family in Southampton opening theirs via skype, was great to see my little and big brother enjoying their gifts. I also promised to show my little brother all the snow we had so skype was really handy in the end!


I did actually have what we call 'mini Christmas' there a couple of weeks ago. I like to see my little brother open the presents from me (that Father Christmas dropped off early as he'd been a good boy!) so I can join in some of the fun. He also gets so many he'll be overwhelmed with things to play with, so we all swap present then. This is the first year I've been able to buy proper presents for everyone now that I have a real job! So I let my brothers open all of theirs, but only let my dad and stepmum open one so they kept the special ones for Christmas day.  I also got my presents early too!

As we came last minute to Norway my mum and I decided to open ours to each other early too! Would be pointless to bring them all here just to bring them back, so yay! I've picked out the presents I got related to baking to show off, I absolutely love them! I got some lovely normal presents too but I thought you'd be more interested in these goodies as I'm sure they'll be featuring in future posts.

So, the baking gifts received:
  • Wilton cupcake tin
  • Wilton cake leveler
  • Wilton pink cupcake stand
  • Wilton red icing
  • Mrs Beeton pie dish
  • Mrs Beeton shortbread mould
  • Rachel Allen baking set
  • Set of large piping nozzles from T.K Maxx
I loooove pieces from the Wilton range, but find them expensive so don't usually buy them for myself much. I'm so made up with the tin, as you know I know I normally do the stand alone cupcakes, and generally love everything to do with cupcakes so will be nice to keep the same theme but do a lying down one. There's also so many ways to decorate so I can't wait for my first excuse to use it. The red icing is also soooo handy, as this was one I got for mini Christmas I managed to get a lot of use from it with the gingerbread baubles.

I also love my cupcake stands but most don't hold many, this one is pretty huge compared to other cardboard ones I have and they're of the royal wedding theme so only go with so much, this one is far more general. The Rachel Allen baking set I've have my eye on for a long long time, every time I saw it in Tesco I would just pick it up and hug like a child! (yes I am mental). The same goes for the Mrs Beeton ones...I'd love to think I'm not that conventional but damnit I am, I want to bake pies and shortbread all day! I actually really love that the pie funnel is a lilac/blue bird!! I did in fact have a leveler....but I broke it, so am so glad I got a new one I really can't cut straight enough myself. And as for the piping nozzles...well...I have a bit of a piping fetish and want to pipe onto everything, I have in fact been able to use these already in my Christmas Cupcakes post.

I'm sure when I'm back you will all see these gifts used in various posts so look out for those! Pin It Now!

Friday, 23 December 2011

Christmas Cupcakes and Festive Cake Pops

As you know my Christmas baking is going to be a bit all over the place this year but I did manage to sneak this order in before the packing for Norway commenced! I am infact now here finally and it's covered in snow yay! We celebrate on Christmas eve here so it's all kicking off tomorrow.


Anyway, I had a cute order for Christmas, cupcakes and cake pops, I haven't made cake pops in a while so I was really looking forward to it. The theme was Christmas. Do forgive me I'm writing this on my iPhone on the app for the first time so we'll see how this goes! I can't seem to move the pictures to the top...may have to fish out the mac.


The cupcakes are vanilla and I stuck to two designs as there were for a stand, one half I made look like Christmas puddings with green fondant leaves and red piped berries. I also have them a generous dusting with gold cake glitter to really make them sparkle, I have to say I love them! The other design was more simple with cute miniature candy candles with another generous helping of red cake glitter.all of the cakes were topped with vanilla buttercream first and I'm sure they will look great on the Christmas table.


Next for the cake pops, these again were a vanilla mix of cake and buttercream. I dipped them in both white and milk chocolate. I made ones covered totally in gold glitter, red glitter, candy canes and again Christmas puddings! I absolutely love these they're so cute and will make great gifts. I put them in cellophane gift bags that i got from Sainsbury's and tied them with Christmas ribbon from Tesco. I'm so happy with how they look and will have to make some more soon I forgot how much I love them.

Merry Christmas ! Pin It Now!

Sunday, 18 December 2011

Snowflake Mince Pies

First of all I have to say, I know I haven't blogged in a while. A lot of my Christmas baking is now off as we're taking a last minute trip to spend Christmas with my nan in Norway so there's been a lot of last minute changes so there won't be as many festive bakes as I promised...but I still managed to sneak a couple in! I'm just going to post the pictures in order of making throughout rather than all at the end with the recipe so sorry it may looks a bit random!.


OK an admission here...I've never had a mince pie...I've always seen them as things I knew I just didn't like so would never try (yes I am actually seven years old!), but we were in a pub the other week and one came with a coffee..so I thought..you know what? I'm going to try one. And I loved it, I can't believe I didn't think I would considering it's packed full of Christmas spices which I adore and pastry! Seriously...what have I been thinking all these years, I am now converted.

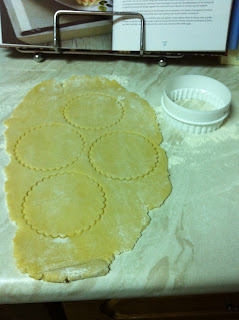
So I thought, right, perfect, that will be one of my festive bakes. I love it when you see them topped with a pastry star or some other pretty shape rather than topped completely with the pastry. I bought some really cute snowflake cutters from John Lewis, I've been looking for some for ages that had to right spikey look as most are too plain looking, I thought topped with these they would look a bit different to most and just be a bit more special.


I really wanted mine to be deep-filled, so I whacked great big dollops of mincemeat in there, not thinking about the fact that when it cooks it bubbles up and spills over everywhere...luckily I only lost a couple to this...they became the 'testers'....you know, to make sure they weren't poisonous of course!

I did think about making my own mincemeat, but everyone who's made it said it just isn't worth the effort if you buy a decent enough brand so I though I would cheat and get it from Tesco and I have to say I was really impressed and don't see myself tying to make my own for a while.


I do have to say I was pretty proud of my pastry, even since watching The Great British Bake Off I've become obsessed with the science of pastry making, over-working it, under-working it, making sure it's short enough, thin enough arrgh! But I have to say Mary Berry would have been pleased with mine :). I love that it had an almond pastry as it made it super crumbly.

Right time for the recipe

Almond Pastry
  • 225g plain flour
  • a pinch of salt
  • 50g ground almonds
  • 85g icing sugar
  • 175g unsalted butter, diced
  • 1 medium egg yolk
Filling
  •  400g luxury mincemeat
  • 1 tbsp brandy, rum or Amaretto
  • icing sugar or caster sugar for sprinkling
Method
  1.  To make the pastry, put the flour, salt, ground almonds and icing sugar in a bowl and mix until all incorporated.
  2. Then add the diced butter and rub in until it resembles fine breadcrumbs, you can do all of this in a food processor but I love making pastry by hand. Add the egg yolk and mix it until it comes together in a soft but not sticky ball. If you need to you can add a teaspoon of water to pick up any remaining dry ingredients.
  3. Wrap in clingfilm and chill for 15 minutes until firm but not rock solid.
  4. Heat the oven to 180 degrees/350 F/gas mark 4, roll out pastry onto a floured work surface to about 4mm. Cut out 12 rounds using a cutter slightly larger than holes in a muffin tray. I did mine in foil cases so did them a little larger than the case. You also need to make sure you cut out the same amount of snowflakes or you'll get to the end and realise you don't have any toppers!
  5. Press the rounds into the cases and push the pastry all into the sides to get all over the air bubbles. Stir the mincemeat and add the alcohol, spoon 1 1/2 tsp of the mixture into the pastry and lay a snowflake onto the surface of each pie.
  6. Bake for 20 - 25 minutes or until firm and just golden. Richer pastry tends to brown quicker so do keep an eye on them. Leave to cool for a few minutes before sliding them out of the trays, don't cool them for too long though as they're gorgeous when eaten warm! Serve with dusted sugar and even a dollop of cream as there's always cream in the fridge of Christmas!
  7. Eat! Nom!
Pin It Now!

Friday, 9 December 2011

Gingerbread Baubles

Sorry I've left it a while posting..I've been sick! I've been ill one other time this year which must be a record for me, so I've been feeling quite sorry for myself and even had to leave work in a taxi as I was feeling so bad!! After dying in bed for a day and a half I finally managed to drag myself out of bed to help my mum put up the Christmas decorations. For the last couple of years now we've been having a real tree at home which I love, I know they're a little pricey but I think it's worth it for Christmas.


As I've not been well I haven't been able to bake anything.  It's gingerbread season in our house at the moment, I will put up recipes soon but at the moment I've just been watching it all happen. However the last couple of days I've felt better so I could decorate. I love gingerbread tree decorations, especially Peggy Porschen ones in her Cake Chick book.


 We have a very traditional Christmas look...reds, greens, gingham etc. So I decided to keep this batch of gingerbread baubles in white and red. I only did 6 or 7 as we already have so much on our tree I didn't want to go too crazy.


We've made lots of gingerbread shapes but mainly plain circles or hearts for the baubles. To decorate I used a base of white royal icing and for the detail I used Wilton Red Icing in a tube that I got for mini Christmas in my stocking (will explain all in another post!) which was good so I didn't need to mix an extra batch. I attached a nozzle with the tiniest hole I could find and piped on some detail I shamelessly copied from the book. I also added some siver balls...you can't have Christmas treats without silver balls right? Let them dry and threaded some wrapping ribbon through the holes in the gingerbread and hung them up!


I'm not sure which design I like the most...I think it's the one with the silver balls cascading down the baubles. I think these would look great in funkier colours like purple and maybe even teal? You can do so much with them even write names...I might have to have another go :)

Keep posted for many more Christmas baking recipes, the gingerbread recipe will hopefully follow tomorrow, it made so much we also managed to make three individual gingerbread houses along with the millions of biscuits and tree decorations. These will also tie in with my seven kinds of Christmas biscuit tradition, now I also have to decide which other six to make. I have to say while you all know I love baking...baking at Christmas is far better, stick some festive and cheesy music on, gingham apron tied and I'm literally in my element and I intend to be covered in some form of batter and flour for the next few weeks! Pin It Now!
Related Posts Plugin for WordPress, Blogger...