Sunday, 24 July 2011

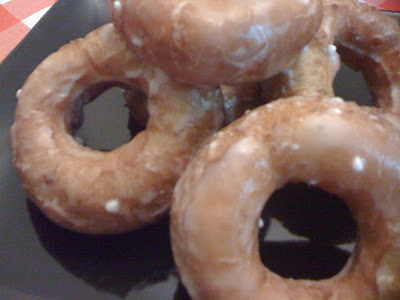
Krispy Kreme Doughnuts Recipe

I think we can all agree it's been a pretty horrific weekend news wise, being half Norwegian myself I find myself really glued to the news and in shock at what the world has come to. While I'm not saying doughnuts make the world a happier place...but it's a nice bit of escapism for a couple of hours and for a little while you can concentrate on something happy.

I found this American recipe that uses cup measures...usually I try to convert them, but I have some nice heart shaped cup measures so I thought I would stick with it. It makes quite a big batch so you might want to halve it if you want to just try it out.

Recipe:
  • 2 cups scalded full fat milk (I shamefully didn't know what this meant, but has since found out it is when you heat it until boiling...scalding hot...
  • 1/2 cup butter
  • 2/3 cup caster sugar
  • 1 tablespoon salt
  • 2 tablespoons yeast (use fresh if you can, just double the weight of it as it does rise better, I would have used it but I tried to freeze mine but when I defrosted it, it turned to sludge in the fridge - not very nom)
  • 4 free range eggs, beaten
  • 1/4 teaspoon nutmeg
  • 7 cups sifted plain flour
  • oil - I used vegetable
Glaze
  • 3 cups icing sugar
  • 1/2 teaspoon salt
  • 1/2 teaspoon vanilla sugar/extract
  • 1/2 cup cold water
Method
  1. Melt butter in the hot milk, add 1 teaspoon of the sugar and then the salt. Leave to cool.
  2. Beat in yeast, nutmeg, eggs sugar and 3 cups of the sifted flour.
  3. Add the rest of the flour the dough should be sticky, I found I had to add a little extra flour but be careful and only add a bit at a time to avoid it going dry.
  4. Knead the dough for five minutes and leave to proof somewhere warm for 1 - 1 1/2 hours.
  5. Roll out the dough and cut into shapes, leave to rise again for about 45 minutes.
  6. Using a sugar thermometer if you don't have a deep fat fryer like me, heat the oil to 350 degrees Fahrenheit, maybe just under, they say it should be hotter but for me they came out very dark so I turned it down.
  7. I then cut holes in the doughnuts as the middle can go a bit doughy. I then cooked then for 1 - 2 minutes or until brown and flip and the same on the other side.
  8. Scoop out and leave to cool.
  9. Mix the glaze ingredients together, you can always add extra flavours to these if you want, I went for the original one to begin with maybe next time I'll be more experimental.
  10. Dip the doughnuts in the glaze so the whole thing is covered, it will look very white to begin with but it does drip down to a glazed look.
  11. Leave for a minute to set then eat. Nom!
Pin It Now!

Sunday, 17 July 2011

4th Birthday Snow White Giant Cupcake

So it's that time of year again, my niece's birthday and this time she turns four.  I've made her a birthday cake the last two years so this one could be no exception.

The first one I made was an In The Night Garden Cake, and while I loved it, I was very new to it and didn't even level the layers! So it was very lumpy and bumpy. This is what gave me the cake bug! The next year I made her a little princess castle cake, I hadn't researched it much but I think it turned out well.

This year she is still very much into the princess theme, Disney Princess to be precise, and Snow White in particular, I've lost count of all the times she made up watch that film! And while I'm not sure how making Snow White would actually look, so I thought maybe another giant cupcake would look good. I know I make a lot of these, but she loves cupcakes so I though it would be quite fitting. I decided to make it in the theme of Snow White's dress rather than what she actually looks like.

The base is covered with blue fondant icing, coloured with Baby Blue sugarflare paste, and the red stripes in Christmas Red. I made the buttons from Melon yellow, wet them and covered them in cake glitter, not shimmer - girls can never have too much glitter and she ate these the first!.

For the top part I rose iced it with melon yellow buttercream, and dusted it with yellow shimmer this time. I decided to put the 'posion apple' on the front, though for obvious reasons this was posion free! To make this I just carved an apple shape from the christmas red fondant, brushed it with corn syrup and drenched it in red cake glitter and left it to dry. I used the corn syrup rather than water so it would still look shiny. I then piped on a stalk and the number four.

Luckily she loved the cake, we ate it for breakfast and the rest went home with her. Unluckily I seem to find glitter EVERYWHERE and have a feeling it's going to be around for a while...at least it will make the kitchen look a bit more magical! Pin It Now!

Wednesday, 6 July 2011

Old School Post Of The Month - Angel Layer Cake

As far as I can remember, angel layer cake was always my favourite cake. I'm not sure if it was the name, the colours or the taste, but I loved it.

I've searched for a little while for a good recipe but actually haven't found any that are just like the classic version, everyone wants to add different flavours but by tradition is it just a vanilla cake, so don't be tempted to ruin it by adding anything else. Keep it simple people!

I did have one worry though, usually I'm not too into the artificial flavour, but with this cake one of the best bits about it, is that it is a bit artificial...am I right? So I was worried that by making it good...I would make it bad!

Right so let's get into it!

Ingredients:

  • 225g butter at room temperature (a good quality one)
  • 225g caster sugar
  • 4 large free range eggs
  • 225g plain flour
  • 1tsp baking powder
  • 3 tbsp whole milk
  • 1tsp vanilla extract
  • 85g icing sugar
  • 35g butter again, keep this aside for the buttercream
  • pink and yellow food colouring
Method:
  1. Preheat oven to 180 degrees (celcius).
  2. Cream butter and sugar until light and fluffy.
  3. Break in two eggs, half of the flour, baking powder and vanilla (sifted), whisk, and repeat with the other half. Now add the milk and whisk into the mix.
  4. Take a third of the mixture into a seperate bowl and add either the pink or yellow food colouring until you get the desired depth, remember, it's 'angel' cake, so don't make it too strong.
  5. Take another third in another bowl and mix in the other colour.
  6. Now grease and line a loaf time, three if you have them.
  7. Divide the mixtures into the tins and bake in the oven for about 25-35 minutes. Check with a skewer to make sure its cooked perfectly.
  8. Leave to cool
  9. Once cool make the buttercream by whisking together the butter and icing sugar, you can add some more vanilla extract to this for an extra kick of gorgeous if you want - I did.
  10. Level the three layers and stack with a layer of buttercream between the layers. 
  11. Slice and eat. Nom!
Pin It Now!

Tuesday, 5 July 2011

Raspberry Ripple Cupcakes - From The Book That Started It All..Cupcake Heaven!

About a year and a half ago my cake obsession really kicked up a notch. I also enjoyed baking and throughout University I was getting into bits of it here and there, until one Christsmas circa 2009 I was given a book...

Which is quite funny as I had been wanting this book but was too poor so couldn't justify luxuries around Christmas shopping time. The book in question is Cupcake Heaven by Susannah Blake. Buy it, you won't be sorry.

This is responsible for my cupcake obsession and general baking indulgence. One thing I really love is how great the actual pictures are, sometimes the pictures are so rubbish you do wonder if a 3 year old was let loose on them...and I think a 3 year old would do a better job - rant over.


I have a few favourite recipes from here, in particular the Victoria Sponge cupcakes and the Raspberry Ripple ones. My picture the Victoria Sponge one isn't brilliant, so I'll have to make another batch soon to take more photo's - of course!

But while your waiting here's the recipe for the Raspberry Ripple ones to keep you going. I seem to have a nack for taking picture of pervy looking cupcakes!

Recipe:
  • 115g unsalted butter, room temperature
  • 115g caster sugar
  • 2 eggs
  • 115g plain flour
  • 1/2 tsp baking powder
  • 2 tablespoons raspberry jam
  • 150g icing sugar
  • 1-2 tsp lemon juice
  • pink food colouring
  • 12 raspberries
  1. Preheat oven to 180 degrees (celcius).
  2. Beat butter and sugar together until light and fluffy.
  3. Then beat in the eggs, one at a time.
  4.  Sift in the flour and fold into the mixture.
  5. Put the jam into a bowl and stir until runny.
  6. spoon dollops of cake mixture into paper cases and flatten slightly with the back of a teaspoon.
  7. Making a slight indent and spoon a little bit of the jam into the middle. Top with remaining cake mix.
  8. Drizzle a little but more jam on top, and with a skewer marble slightly to get a ripple effect.
  9. Bake in the oven for about 18 minutes until risen and golden.
  10. Transfer to wire rack and cool.
  11. To recorate, put the icing sugar in a bowl and gradually stir in the lemon juice until you have a thick consistently.  Keep some aside for the plain piping.
  12. Add a couple of drops of pink colouring to the remaining and mix for an even colour.
  13. Spoon the icing onto the cakes.
  14. Take the white icing and put it into a piping bag with a narrow nozzle (or a freezer bad with a small part of the corner cut off!) and pip swirls onto the pink icing going into the centre.
  15. Take the raspberries and place one on each of the cupcakes in the centre.
  16. Eat! Nom.
Book image from Bespoke Country Pin It Now!

Sunday, 3 July 2011

This Week In Cakes

This week I had two cakes to make, luckily they were in my favourite form - giant cupcakes! I could make these in my sleep now and you can do so much with them so I love them.


I hadn't done a really girly one in a while so I was really happy when I got an order for a 21st birthday one. Lots of Love Hearts, pink buttercream, stars and even a cute gingham ribbon. The cake itself is Victoria Sponge with jam on the bottom part and more pink buttercream in the middle. I used chocolate brown Sugarflair colouring paste to make the case part, and claret Sugarflair paste for the icing. These really do give off the nicest colours and a little goes a long way. Both the number and the buttercream were made from the claret one, this just shows how deep you can get it by simply adding a bit more.

The next cake here is for Swavesey Primary School Fete to go into the raffle to win it. It's nice to help out where you can and there is no better way than with cake. The theme was 'treasure island' so I thought this was a good representation of it. Because the surface are isn't that massive on top there is only so much you can put on it before it starts looking silly, so I went for of course a treasure chest, made from fondant coloured with melon yellow and chocolate brown, I added some yellow stars to look like the brass studs and make it look a bit more special, I then added some random pieces of decoration to look like treasure. I also added some fondant coconuts, an 'X marks the spot'  and even a palm tree. I discovered making a palm tree out of fondant was almost impossible, so I just made the trunk out of fondant supported with cake wire. And for the leaves I stripped green liqourice, flattened the green cut offs, cute them into palm leaf shapes and stuck them on top just slightly going through a piece of cake wire to keep them together. It was a bit of a mission but I love how it looked so it all worked out. Oh yes and the sand, I mashed together a bag of Malted Milks until they looked like fine sand and covered the top in them (which was subsequently covered in vanilla buttercream), this cake was also made of Victoria Sponge and the bottom was covered in baby blue Sugarflair paste with a few extra stars to give it a treasure feel. Pin It Now!
Related Posts Plugin for WordPress, Blogger...