Showing posts with label GBBO. Show all posts

Wednesday, 28 November 2012

Super Zingy Lemon Cake

I first saw this cake on the first series of the GBBO and have been hunting for it for ages. I absolutely love lemon cake but and have never had one with home made curd that I've made myself, so I thought it was about time I tried it for myself.


So first I'll go through the making of the curd and then I'll go through the actual cake method. I got the recipe for the curd from Ruth Clemens' Pink Whisk blog (which I love), and the one for the sponge from ITV.


Lemon Curd
 
Ingredients:
Zest and Juice of 6 Lemons
120g Butter
450g Caster Sugar
4 Eggs
Makes 1litre of Lemon Curd.

1.Step one is to zest all 6 lemons, so I’ll meet you for the next step in half an hour! 
You need a coarse style grater for the zest.


2.Next, juice all 6 lemons.
It’s important to do it in this order so that once you have grated a knuckle or two in the zesting stage you can follow it up by getting the sting from the lemon juice too! 3.Put the zest and the juice into a thick based pan along with the butter and the sugar.


4.Break the eggs into a large jug and beat well.  Keep to one side.
5.Place the pan over a medium heat and allow the butter to melt and sugar to dissolve.
Once this has happened add the mixture little by little to the jug of eggs, whisking well after each addition.


6.Once both mixtures have been fully incorporated pour back into the pan and return to the heat.
Stir frequently as the lemon curd heats.  Over a medium heat it should take about four mins to begin to boil.  Bubble for a further three minutes to thicken.
7.Take from the heat and pour into ready prepared kilner or jam jars.


8.Allow to cool at room temperature before storing in the fridge. I was told to put a silver spoon in the jar with the curd so to stop the glass from cracking...which I did - and it didn't crack so I guess it worked.
Kept in the fridge the Lemon Curd will last up to three months, but I guarantee you’ll be needing to make some more far sooner than this!

Now for the cake! 


Ingredients:

175 g butter, softened, plus extra for greasing
175 g caster sugar
2 lemons, zest only, plus juice of 1 lemon
3 free-range eggs
1 tsp baking powder
150 g self-raising flour

For the filling:

150 ml double cream, whipped
1 jar of lemon curd
Icing sugar, for sifting.

1.Preheat oven to 160C (fan)/180c/gas mark 4.
2.Grease and base line 2 x 7 inch sandwich tins.
3.Cream together the butter and sugar until light and fluffy.
 
 
4.Add the zest and combine evenly.
5.Add the eggs one at a time with a spoonful of the flour, beating well after each.
6.Fold through the remaining flour.
7.Add the lemon juice and stir to combine.
 
8.Divide the mixture between the two tins and bake in the oven for 25-30 minutes.
9.Allow to cool in the tin for 5 minutes before turning out onto a wire rack to cool completely.
10.Once cool spread the base of the cake with whipped double cream, followed by a good layer of lemon curd. Set the second cake on top, dust with a little icing sugar and serve. I used a stencil I bough from IKEA and then placed in on the pretty cake stand I also bought from there, cute!
 
11.Eat! Nom!


Pin It Now!

Sunday, 18 December 2011

Snowflake Mince Pies

First of all I have to say, I know I haven't blogged in a while. A lot of my Christmas baking is now off as we're taking a last minute trip to spend Christmas with my nan in Norway so there's been a lot of last minute changes so there won't be as many festive bakes as I promised...but I still managed to sneak a couple in! I'm just going to post the pictures in order of making throughout rather than all at the end with the recipe so sorry it may looks a bit random!.


OK an admission here...I've never had a mince pie...I've always seen them as things I knew I just didn't like so would never try (yes I am actually seven years old!), but we were in a pub the other week and one came with a coffee..so I thought..you know what? I'm going to try one. And I loved it, I can't believe I didn't think I would considering it's packed full of Christmas spices which I adore and pastry! Seriously...what have I been thinking all these years, I am now converted.

So I thought, right, perfect, that will be one of my festive bakes. I love it when you see them topped with a pastry star or some other pretty shape rather than topped completely with the pastry. I bought some really cute snowflake cutters from John Lewis, I've been looking for some for ages that had to right spikey look as most are too plain looking, I thought topped with these they would look a bit different to most and just be a bit more special.


I really wanted mine to be deep-filled, so I whacked great big dollops of mincemeat in there, not thinking about the fact that when it cooks it bubbles up and spills over everywhere...luckily I only lost a couple to this...they became the 'testers'....you know, to make sure they weren't poisonous of course!

I did think about making my own mincemeat, but everyone who's made it said it just isn't worth the effort if you buy a decent enough brand so I though I would cheat and get it from Tesco and I have to say I was really impressed and don't see myself tying to make my own for a while.


I do have to say I was pretty proud of my pastry, even since watching The Great British Bake Off I've become obsessed with the science of pastry making, over-working it, under-working it, making sure it's short enough, thin enough arrgh! But I have to say Mary Berry would have been pleased with mine :). I love that it had an almond pastry as it made it super crumbly.

Right time for the recipe

Almond Pastry
  • 225g plain flour
  • a pinch of salt
  • 50g ground almonds
  • 85g icing sugar
  • 175g unsalted butter, diced
  • 1 medium egg yolk
Filling
  •  400g luxury mincemeat
  • 1 tbsp brandy, rum or Amaretto
  • icing sugar or caster sugar for sprinkling
Method
  1.  To make the pastry, put the flour, salt, ground almonds and icing sugar in a bowl and mix until all incorporated.
  2. Then add the diced butter and rub in until it resembles fine breadcrumbs, you can do all of this in a food processor but I love making pastry by hand. Add the egg yolk and mix it until it comes together in a soft but not sticky ball. If you need to you can add a teaspoon of water to pick up any remaining dry ingredients.
  3. Wrap in clingfilm and chill for 15 minutes until firm but not rock solid.
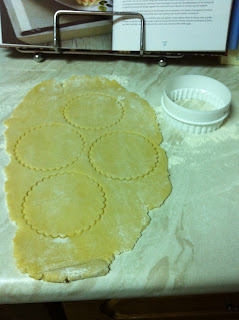
  4. Heat the oven to 180 degrees/350 F/gas mark 4, roll out pastry onto a floured work surface to about 4mm. Cut out 12 rounds using a cutter slightly larger than holes in a muffin tray. I did mine in foil cases so did them a little larger than the case. You also need to make sure you cut out the same amount of snowflakes or you'll get to the end and realise you don't have any toppers!
  5. Press the rounds into the cases and push the pastry all into the sides to get all over the air bubbles. Stir the mincemeat and add the alcohol, spoon 1 1/2 tsp of the mixture into the pastry and lay a snowflake onto the surface of each pie.
  6. Bake for 20 - 25 minutes or until firm and just golden. Richer pastry tends to brown quicker so do keep an eye on them. Leave to cool for a few minutes before sliding them out of the trays, don't cool them for too long though as they're gorgeous when eaten warm! Serve with dusted sugar and even a dollop of cream as there's always cream in the fridge of Christmas!
  7. Eat! Nom!
Pin It Now!
Related Posts Plugin for WordPress, Blogger...